
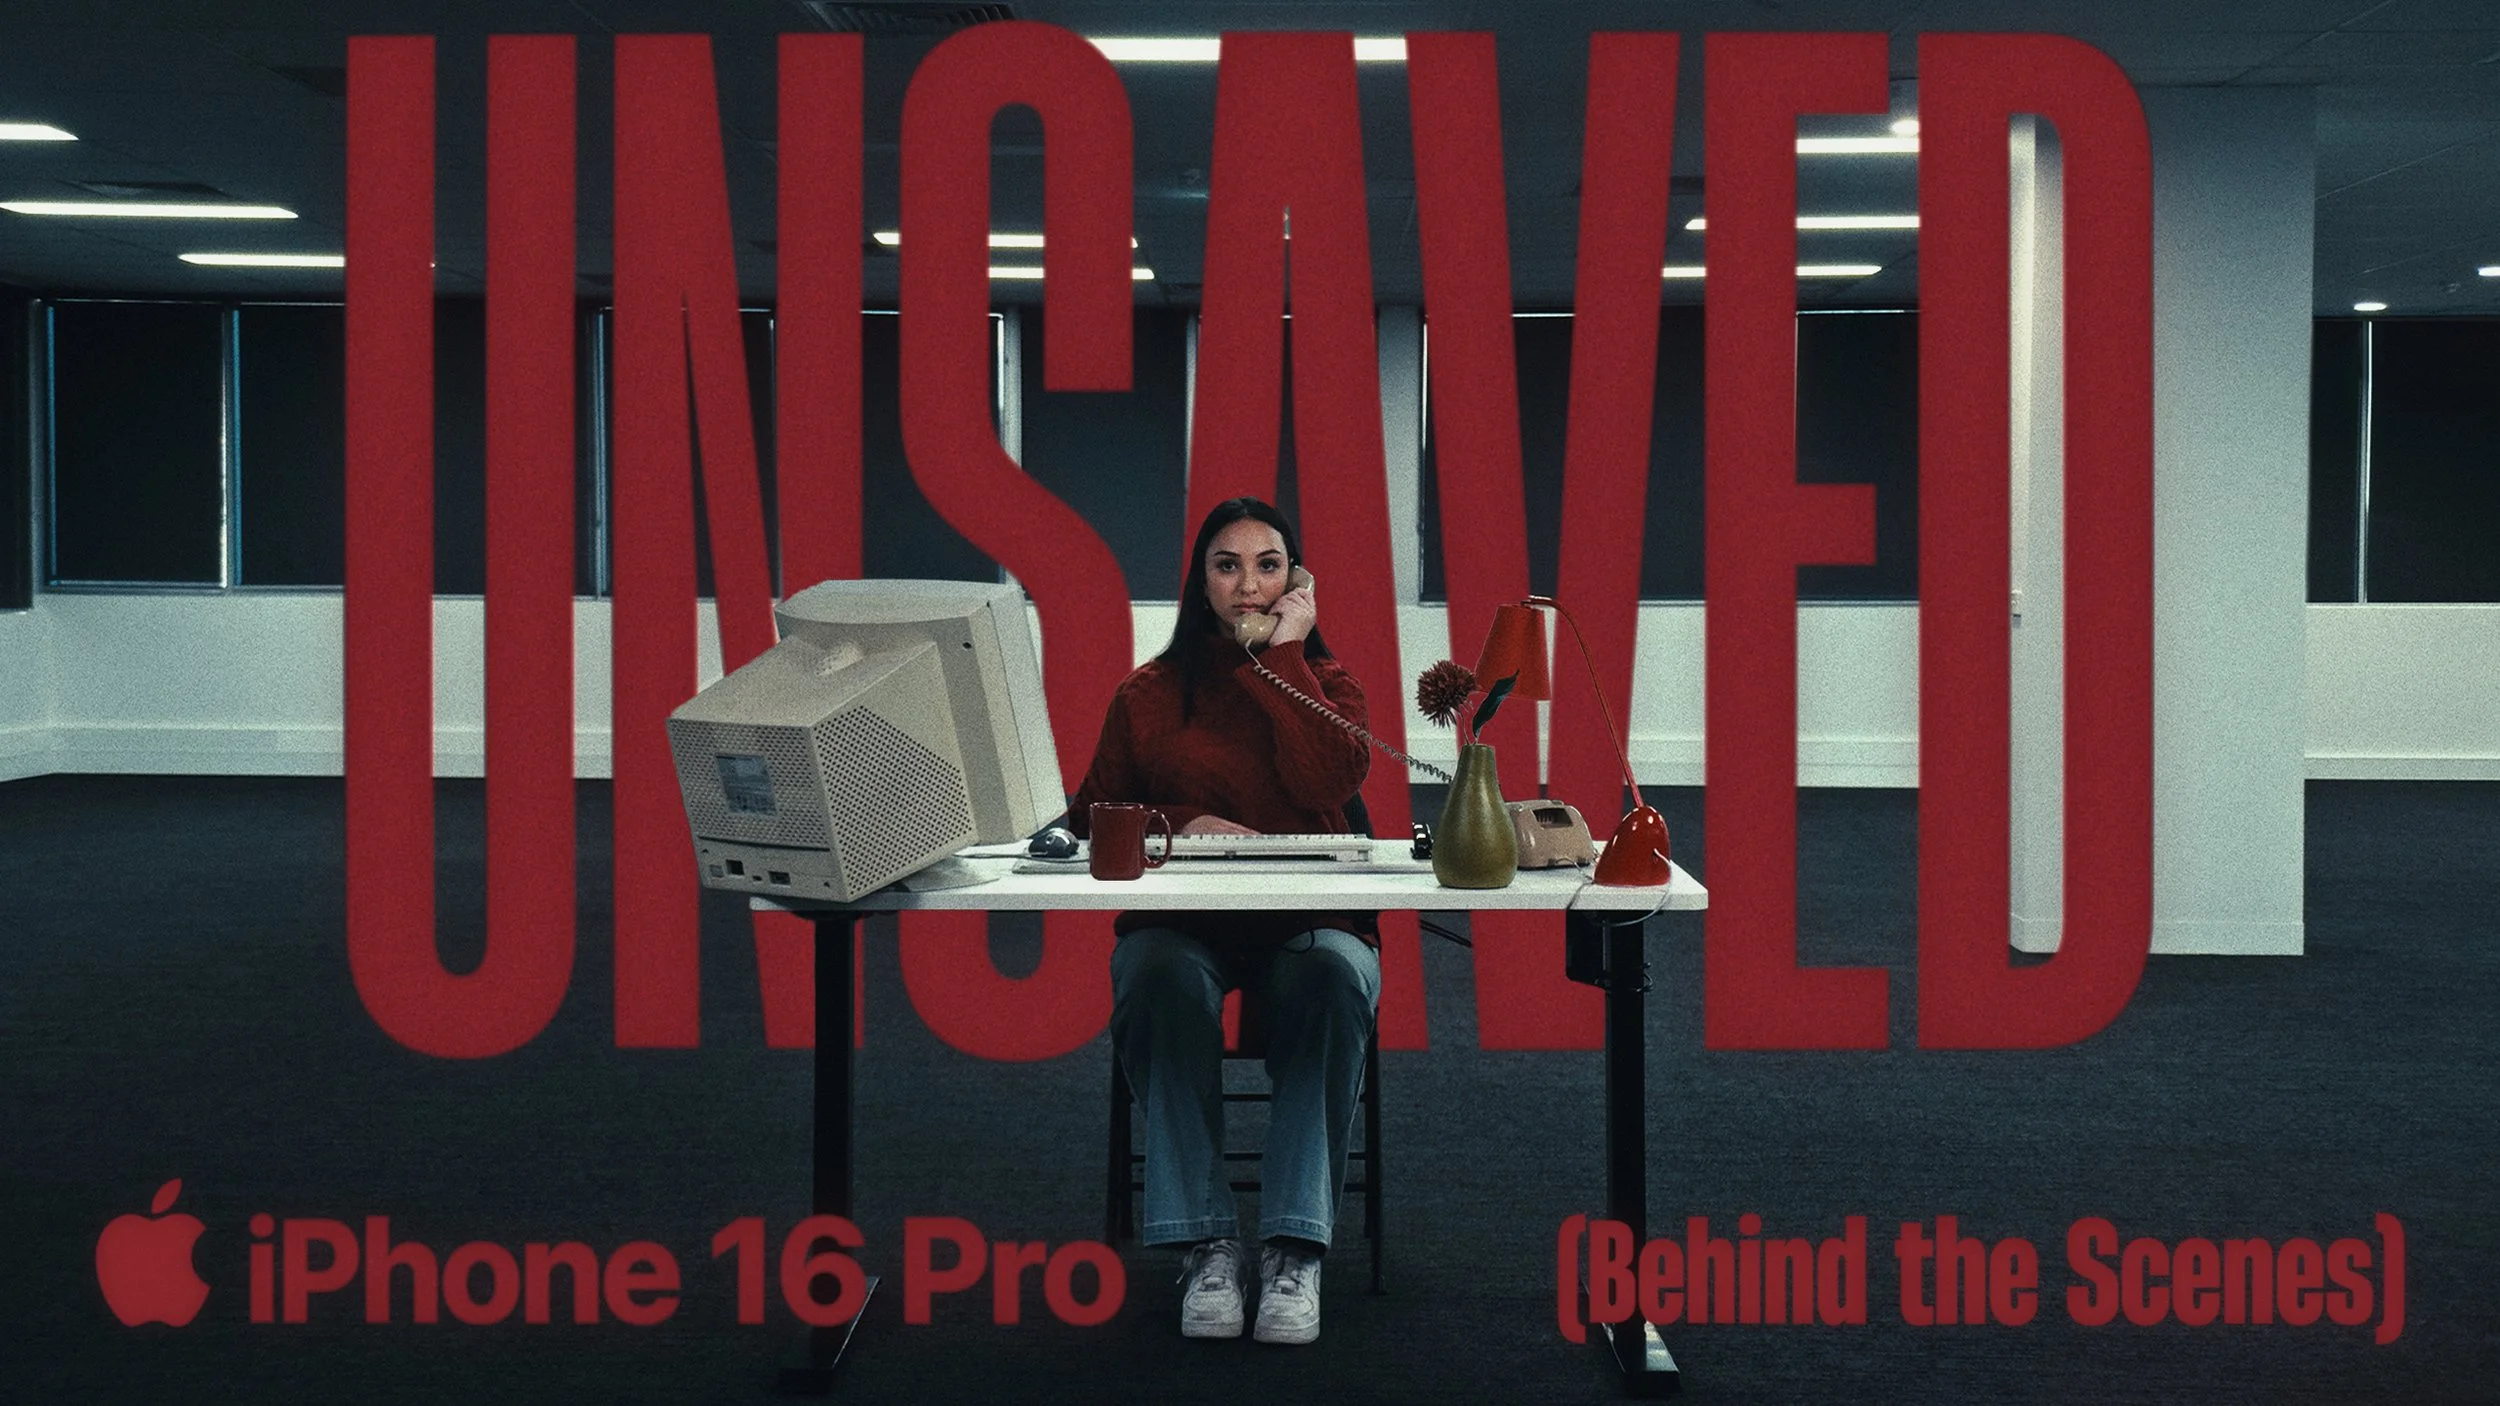
Behind the Lens: Shooting the Short Film Unsaved on iPhone
A breakdown of how we planned, filmed and approached post-production on our latest
Shot on iPhone, thriller short film.
Written by Kirk Mihelakos & Ali Wells | August 15, 2025
Our second Shot on iPhone short film for this year, completely re-affirms how capable it is for our short-filmmaking process.
Our second Shot on iPhone short filmmaking project of the year Unsaved, begun as a spontaneous idea one evening, that turned into reality the following morning. After creating ‘The Trolley Problem’ we wanted to tap into a new genre of filmmaking and up the scale and complexity of our storytelling. A curiosity-inducing thriller emerged from pitching an office worker at a desk in a dystopian, sparse setting, evolved into a multi-location, simulation theory-inspired short film.
Speed was key with this short film, as mentioned we went from initial concept one evening to first day of shooting in the forest the following afternoon and shooting on my iPhone really is a huge reason this was practically and logistically possible. Settings up shots, changing rigging setups and the portability of using my iPhone 16 Pro versus carrying a massive cinema rig, made things infinitely easier.

Shooting on my iPhone is completely liberating when it comes to filmmaking for me. It’s small size, and simplicity allows us to quickly setup shots and focus more on storytelling itself.
Throughout this behind-the-scenes article, I’ll be sharing an inside look and deep dive behind every component of how we shot Unsaved, the pre and post-production processes we undertook to achieve the final film.
Before we jump into everything that went into making Unsaved, take a moment to review our short on Letterboxd or if you’re curious, watch an Uncompressed High-Quality Version of the Film Here.
Our iPhone Camera Setup
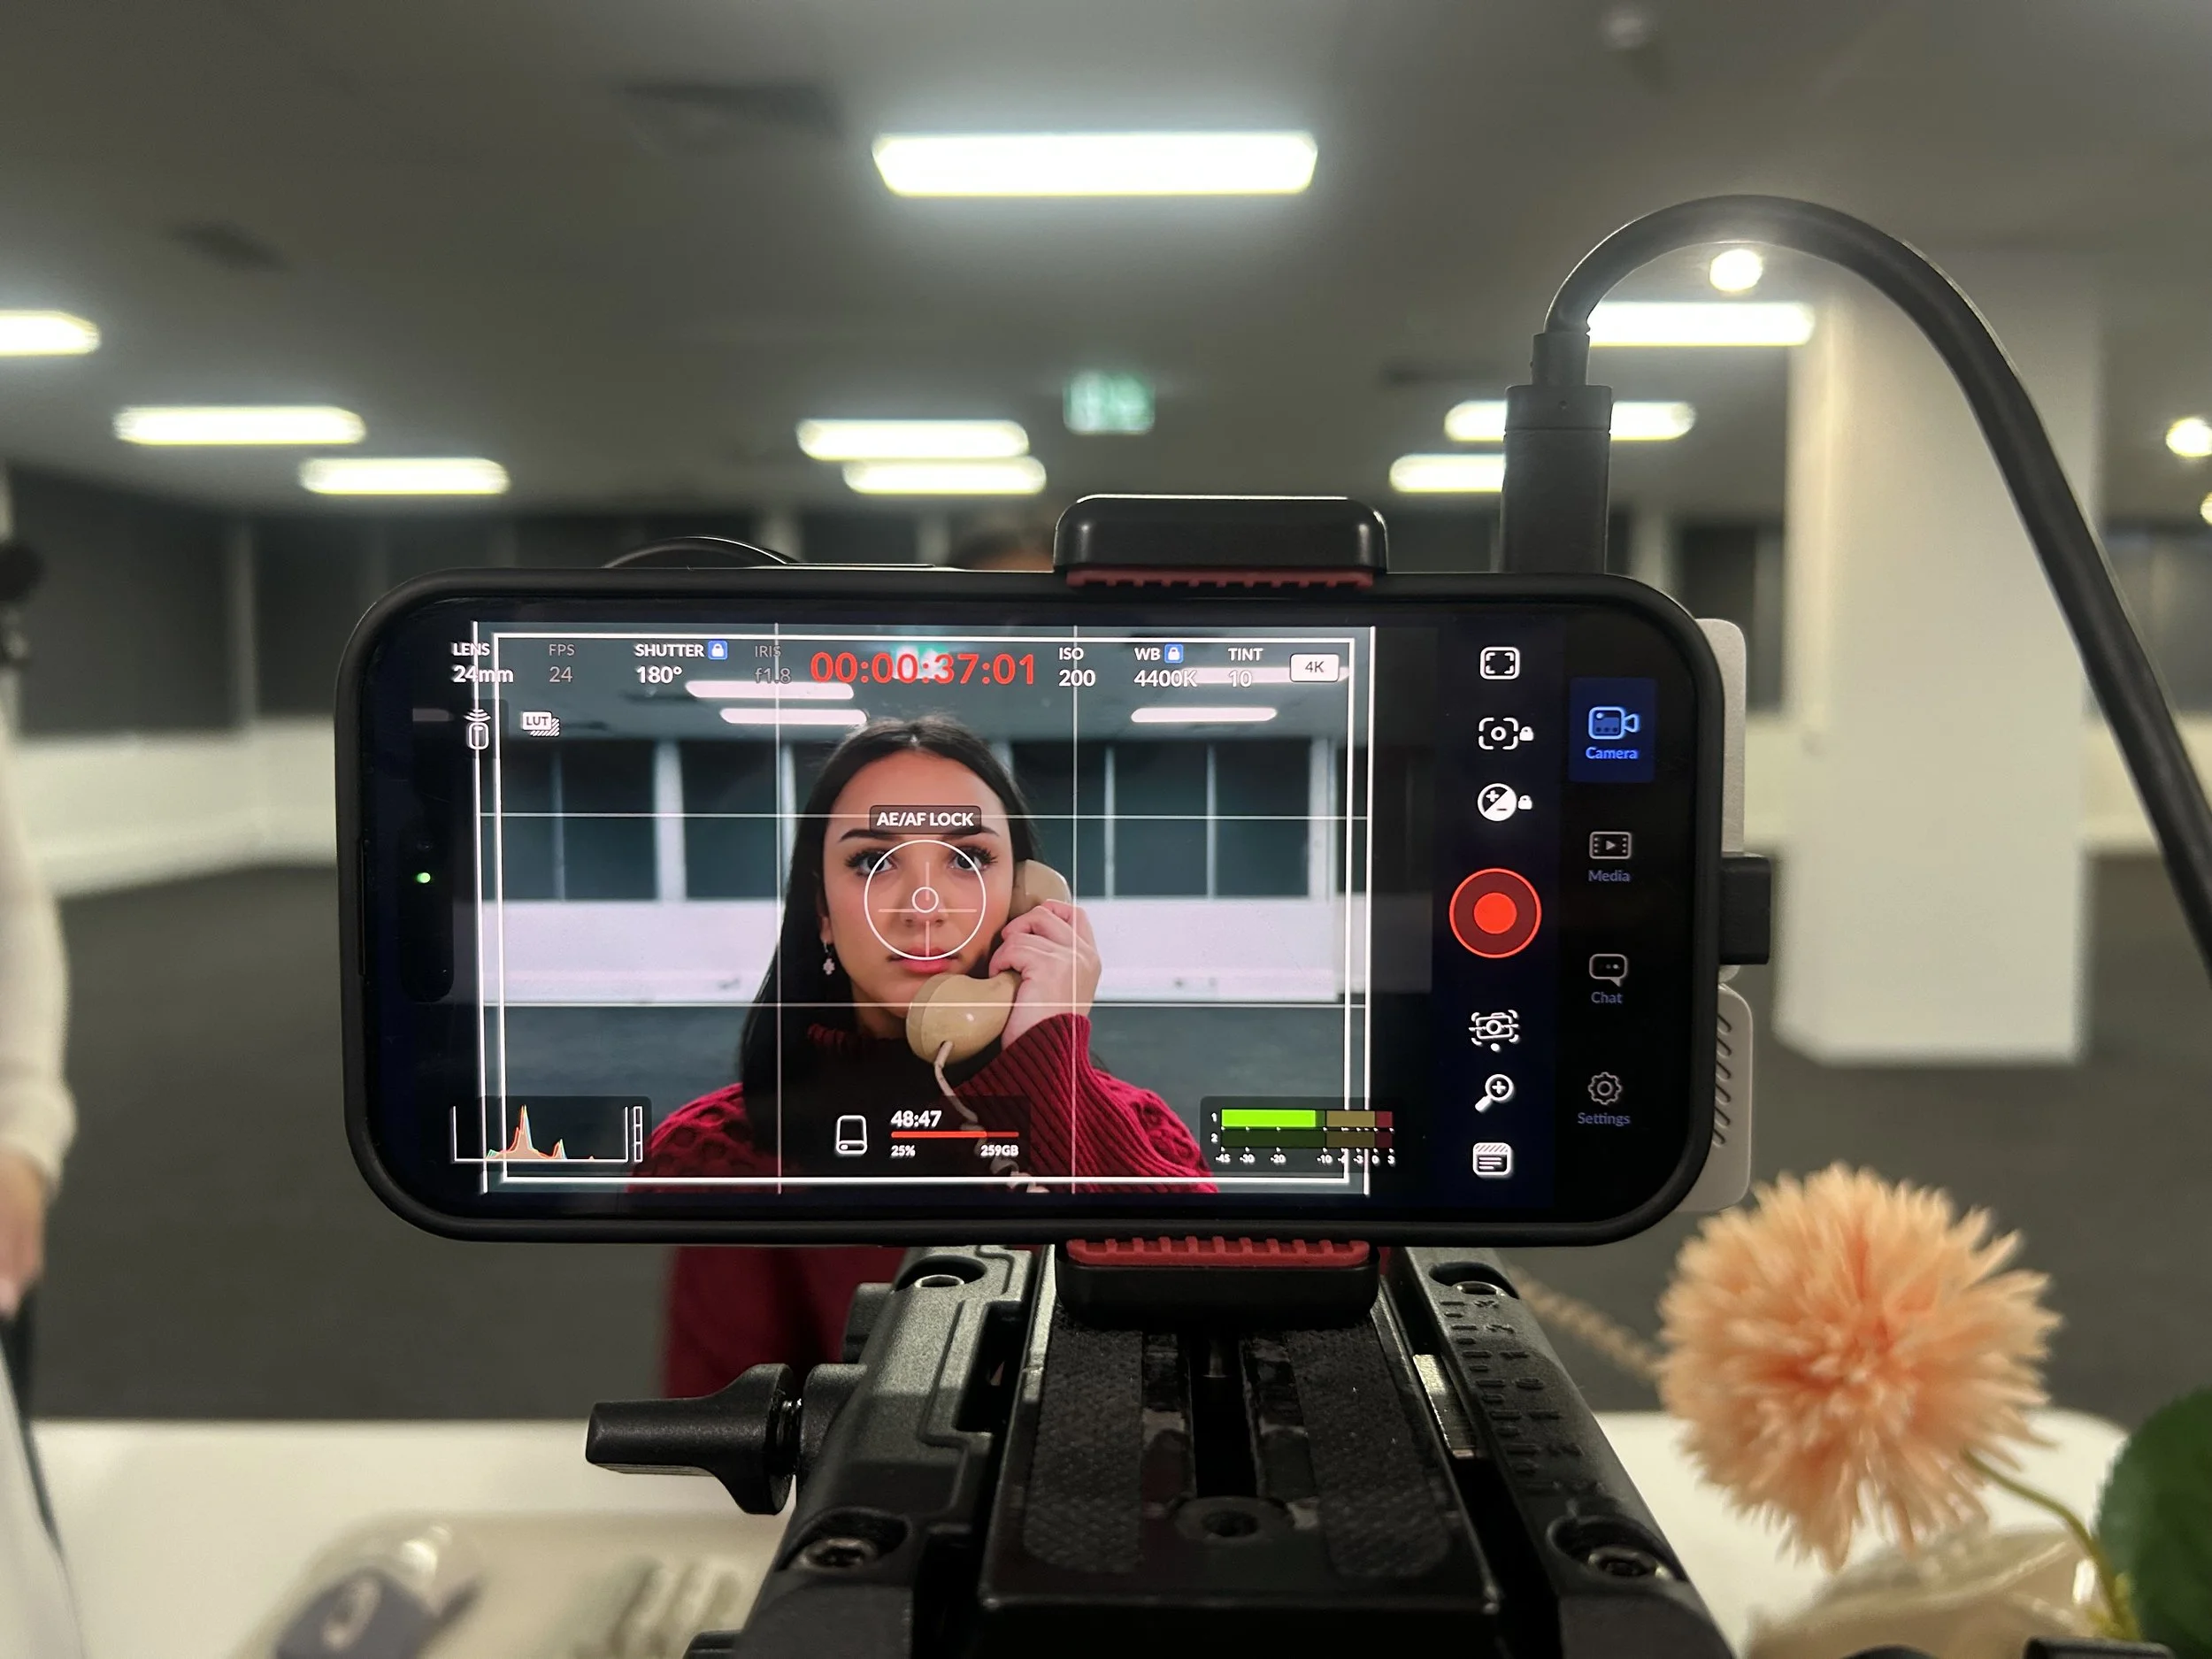
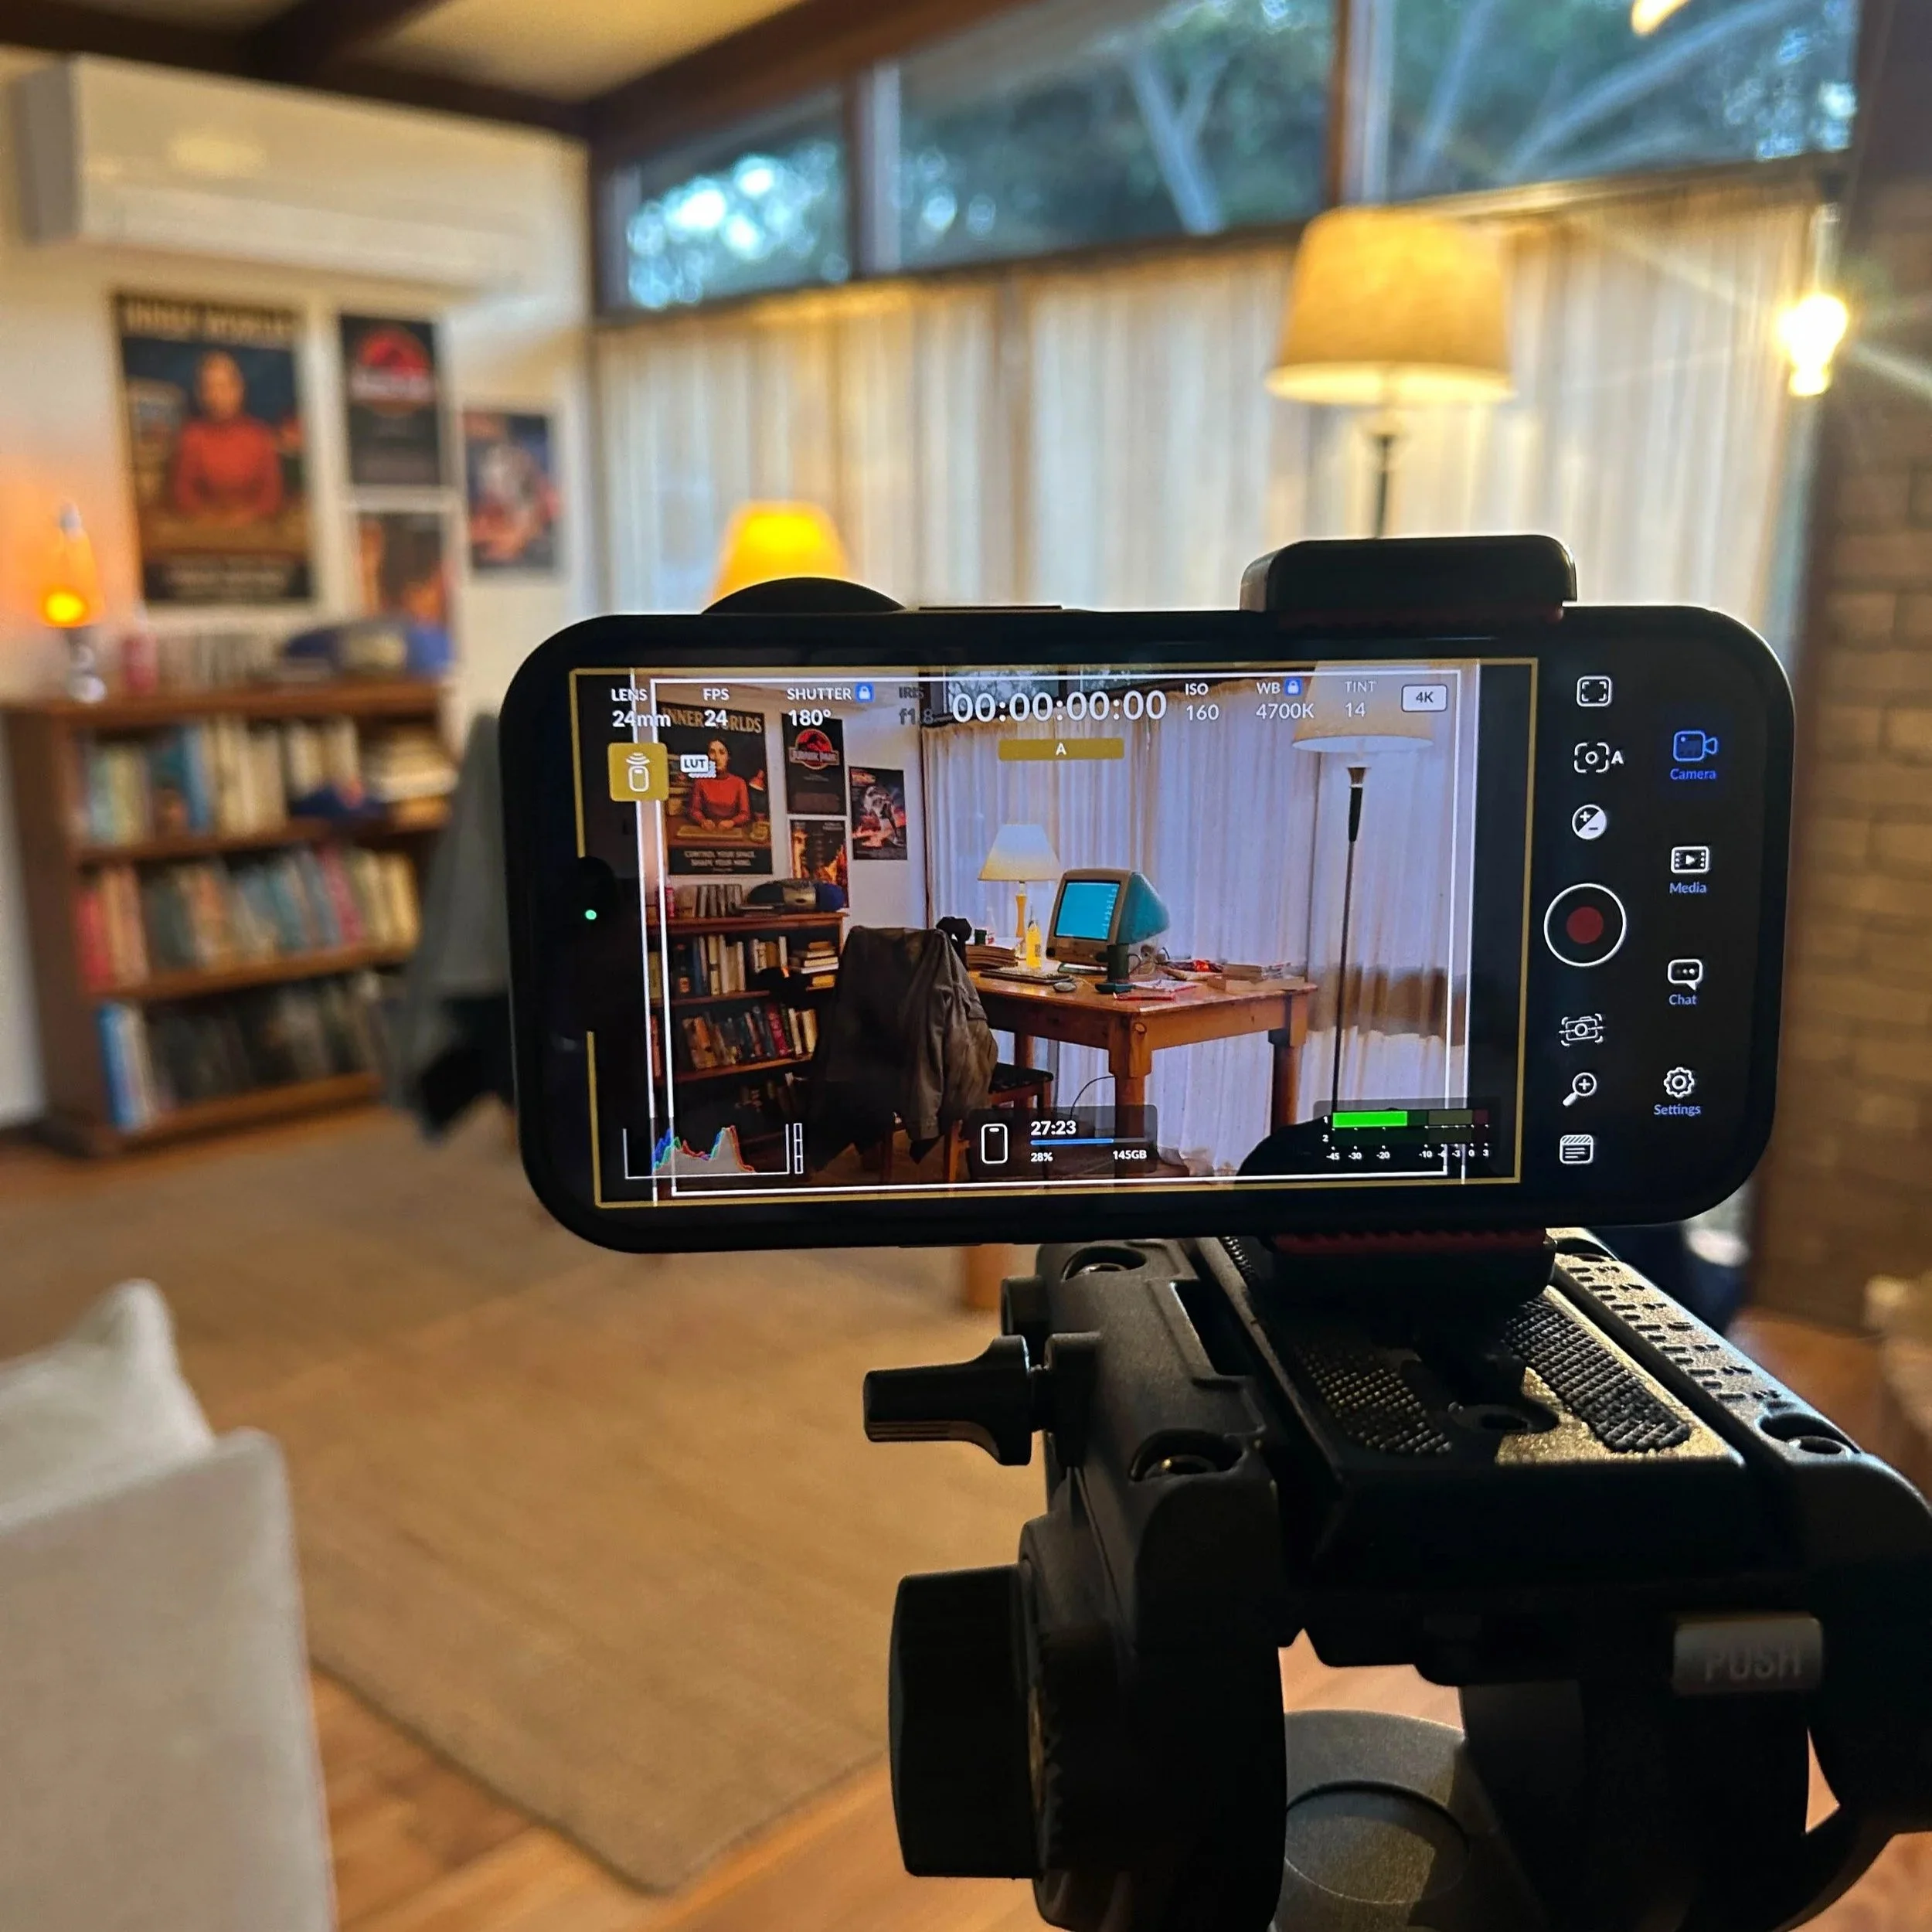
Alongside the iPhone (16 Pro Dessert Titanium 512GB), we utilised the Blackmagic Design Camera App on iOS for manual camera control and monitoring. A Sandmarc 58mm Telephoto Lens (with their included iPhone case) was utilise for the majority of shots throughout Unsaved, alongside the Sandmarc 18mm Wide-Angle Lens for the forest wide, and finally the 100mm Macro Sandmarc lens for all the keyboard, eye and keypad closeups.
On top of the lens in the office environment we added the Sandmarc Variable ND filter, just to maintain our 180-degree rule and achieve correct exposure. However, this was only used on the Telephoto lens in the interior sequences. The forest scene was filmed later in the day, sun-light was minimal and the ND filter there wasn’t needed.
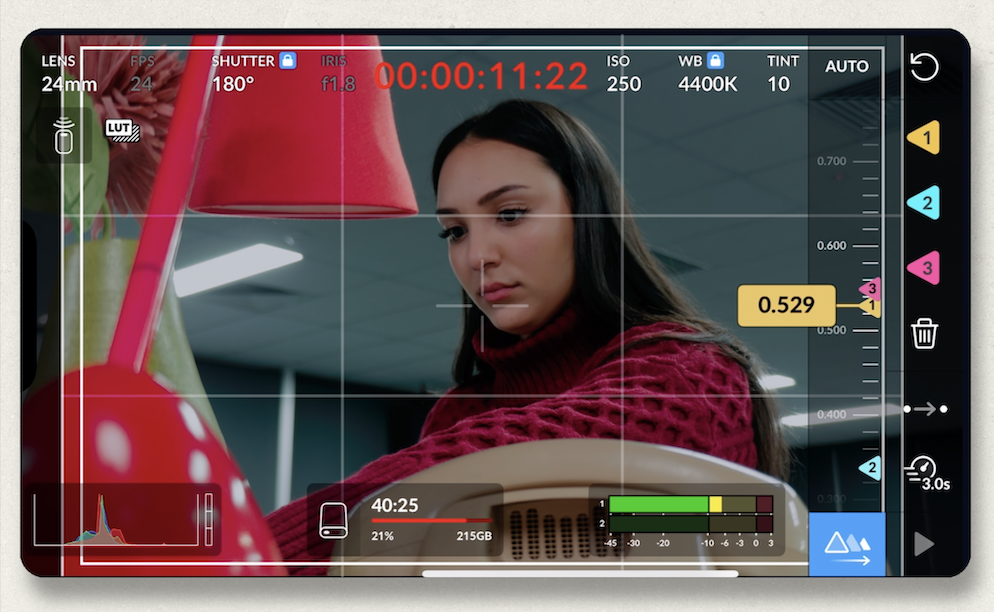
iPhone 16 Pro setup on my YC Onion tripod, alongside the 58mm Sandmarc Lens, connected to the Lexar Go Hub, 1TB SSD and a battery for some extended power,
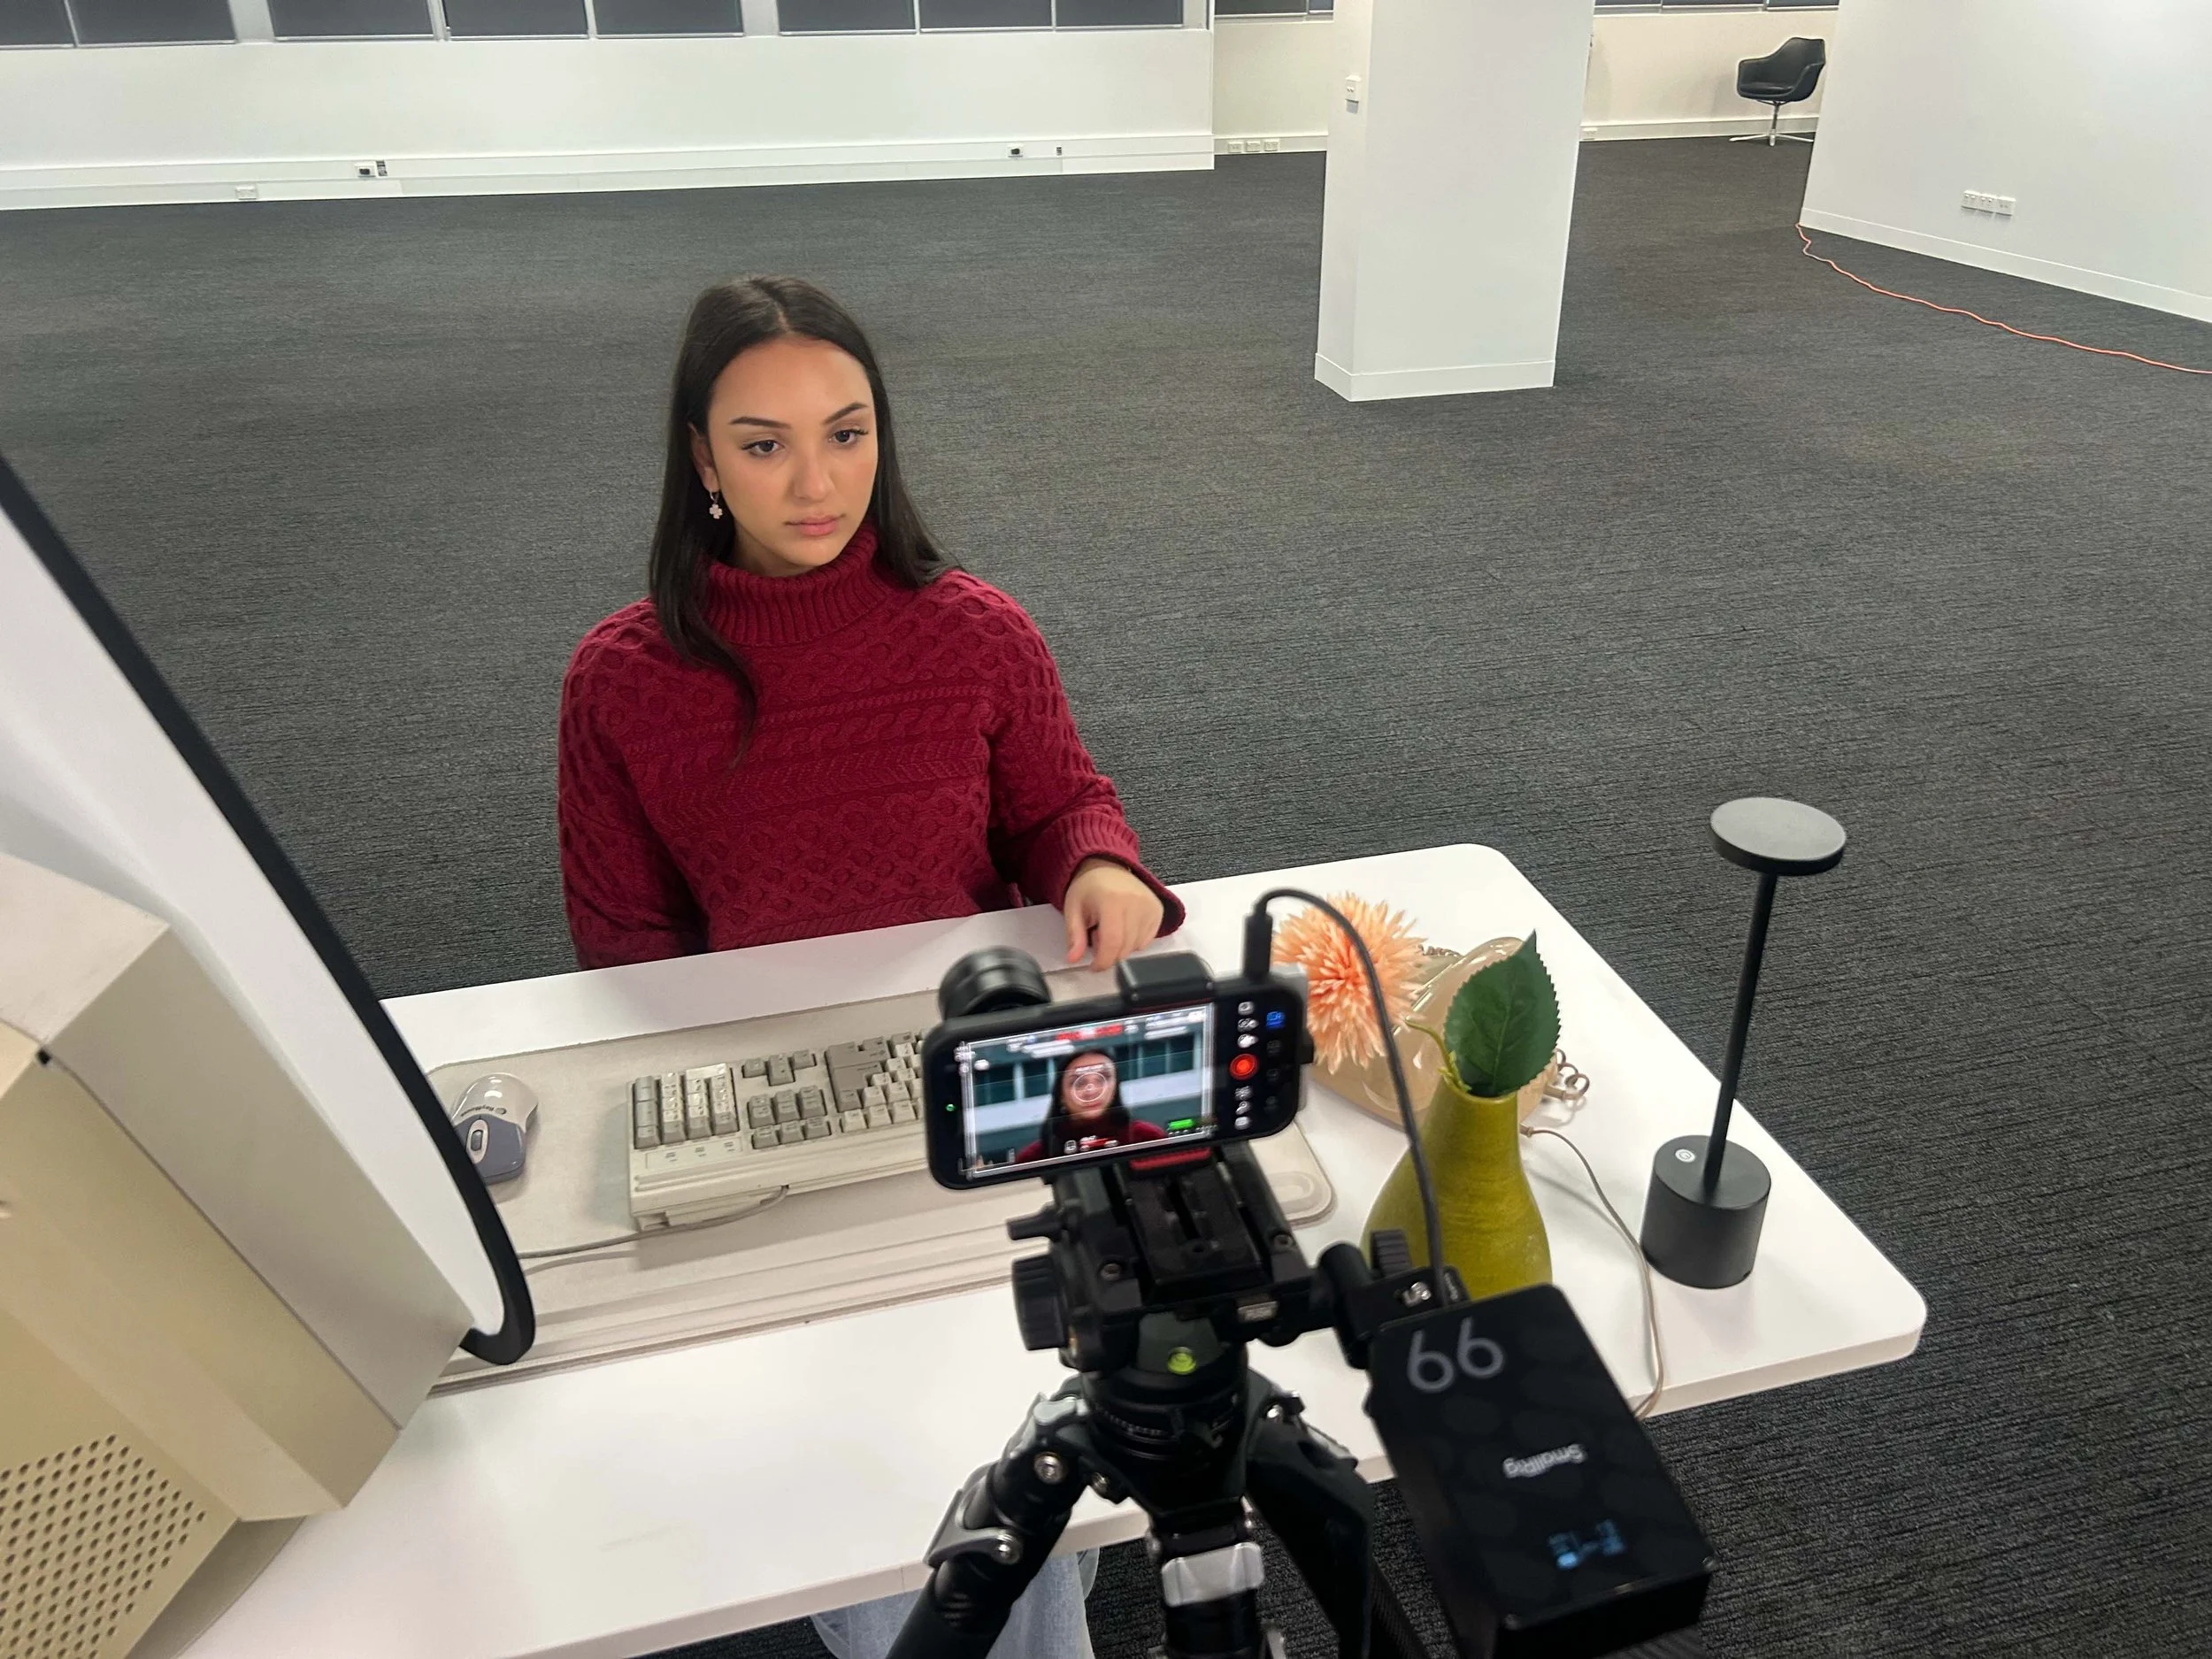
It’s also worth noting, that thanks to the Blackmagic Design Camera App, we were able to remotely monitor the iPhone feed live, on an iPad nearby without any additional hardware. It was incredibly easy to setup, fast, had decent latency, and even enabled us to change settings and check exposure on the iPad, rather than having to reach and touch the iPhone every time.
Blackmagic Camera App on iPad Pro, wirelessly connected to the iPhone.
The app also allowed for setting focus points and pulling focus with ease too, eliminating any jittering occurring when tapping for focus hunting.
Rack focus lets you gradually pull focus between 3 preset focus points. Where you can adjust the speed of the cycles too.
iPhone Settings Used
For the camera curious nerds out there, here is a summary of the settings we utilised:
ISO 54 - 500
24FPS
Shutter Speed 1/48(s)
ND Filter 2 - 6 stops
ProRes HQ
Apple Log
Recorded in the Blackmagic Camera App
White Balance at 4700k and 3600k in the Office sequence
Shot at 4K (3840 x 2160) exported at (3240 x 2160 [1.5:1] aspect ratio)
Additionally but not necessary, we attached a Lexar Go 1TB SSD to the camera for recording. Although to keep the rig lightweight, particularly during some of the gimbal tracking shots, we recorded straight to the iPhone internal storage, selecting a folder on the Blackmagic camera app. I’ll note that recording in ProRes HQ Apple Log is quite taxiing on storage, the entire project took up about 500GB of internal space.
The Blackmagic Camera App being utilised on my iPhone 16 Pro.
Locations and Production Design
Unsaved was shot across three distinct locations, an interior sparse Office Space, a forest and a bedroom. We wanted to take the scope and scale of this project versus our last to a different level, naturally this lead to capturing scenes across a few different, visually distinct locations to serve the story. In terms of those visuals, we wanted each location to have a vastly different colour palette too. This gave us the opportunity to really push our colour grade to the limit, in one short, being able to have a sequence to highlight the blues in the office, the greens of the trees in the forest and the warm nature of the nostalgic 90s bedroom.
One of our favourite shots from the film, set-design, lighting and costumes all coming together.
Travelling to each of these locations with such minimal filmmaking gear was incredibly easy. Rather than having to haul massive cinema cameras and my usual commercial setup, having my phone in a small bag nearby in the forest, whilst focusing our attention on bringing over the larger prop items, made the not so glamorous filmmaking process a whole lot easier (carrying stuff back and fourth to set). Speaking of said forest, we were able to complete the short sequence in the Tolangi National park in a relatively quick amount of time, just before sunlight faded. It in fact was the first sequence we filmed, meaning the remainder of the short was ultimately based around that initial shoot. Given our camera setup was so light-weight it was easy to put it up on a light stand, attach it to a magic arm and send it up high.

iPhones are great for rigging quickly in hard to reach places.
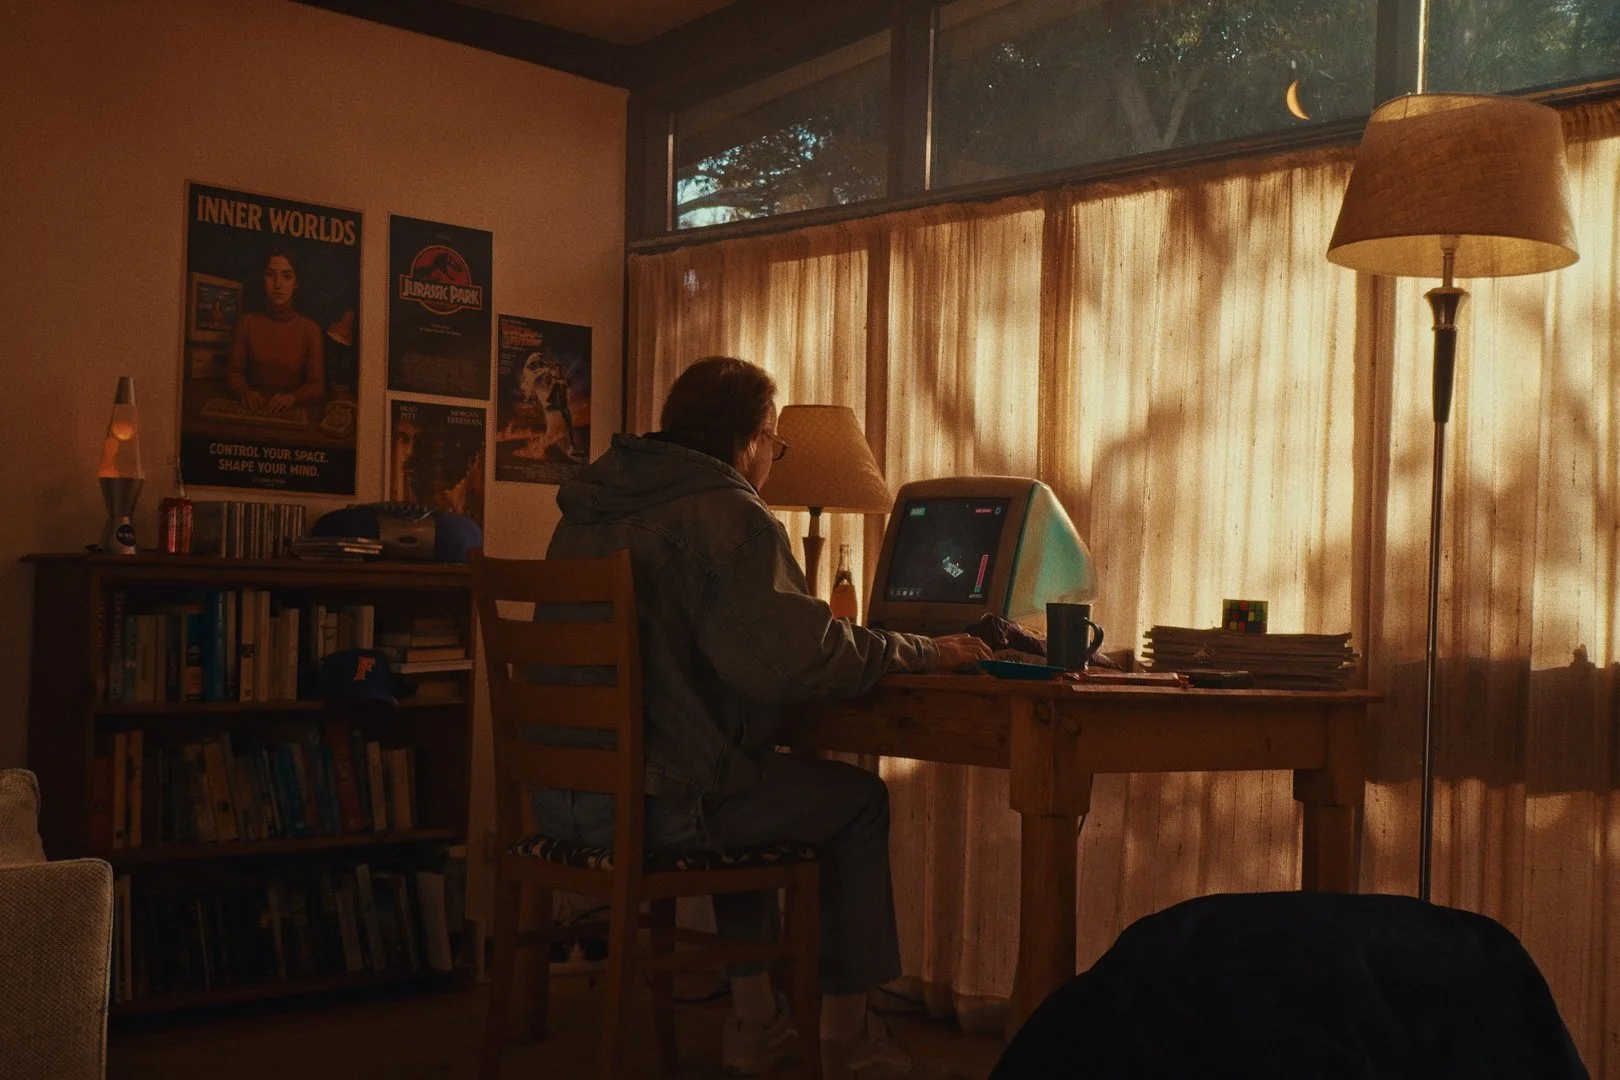
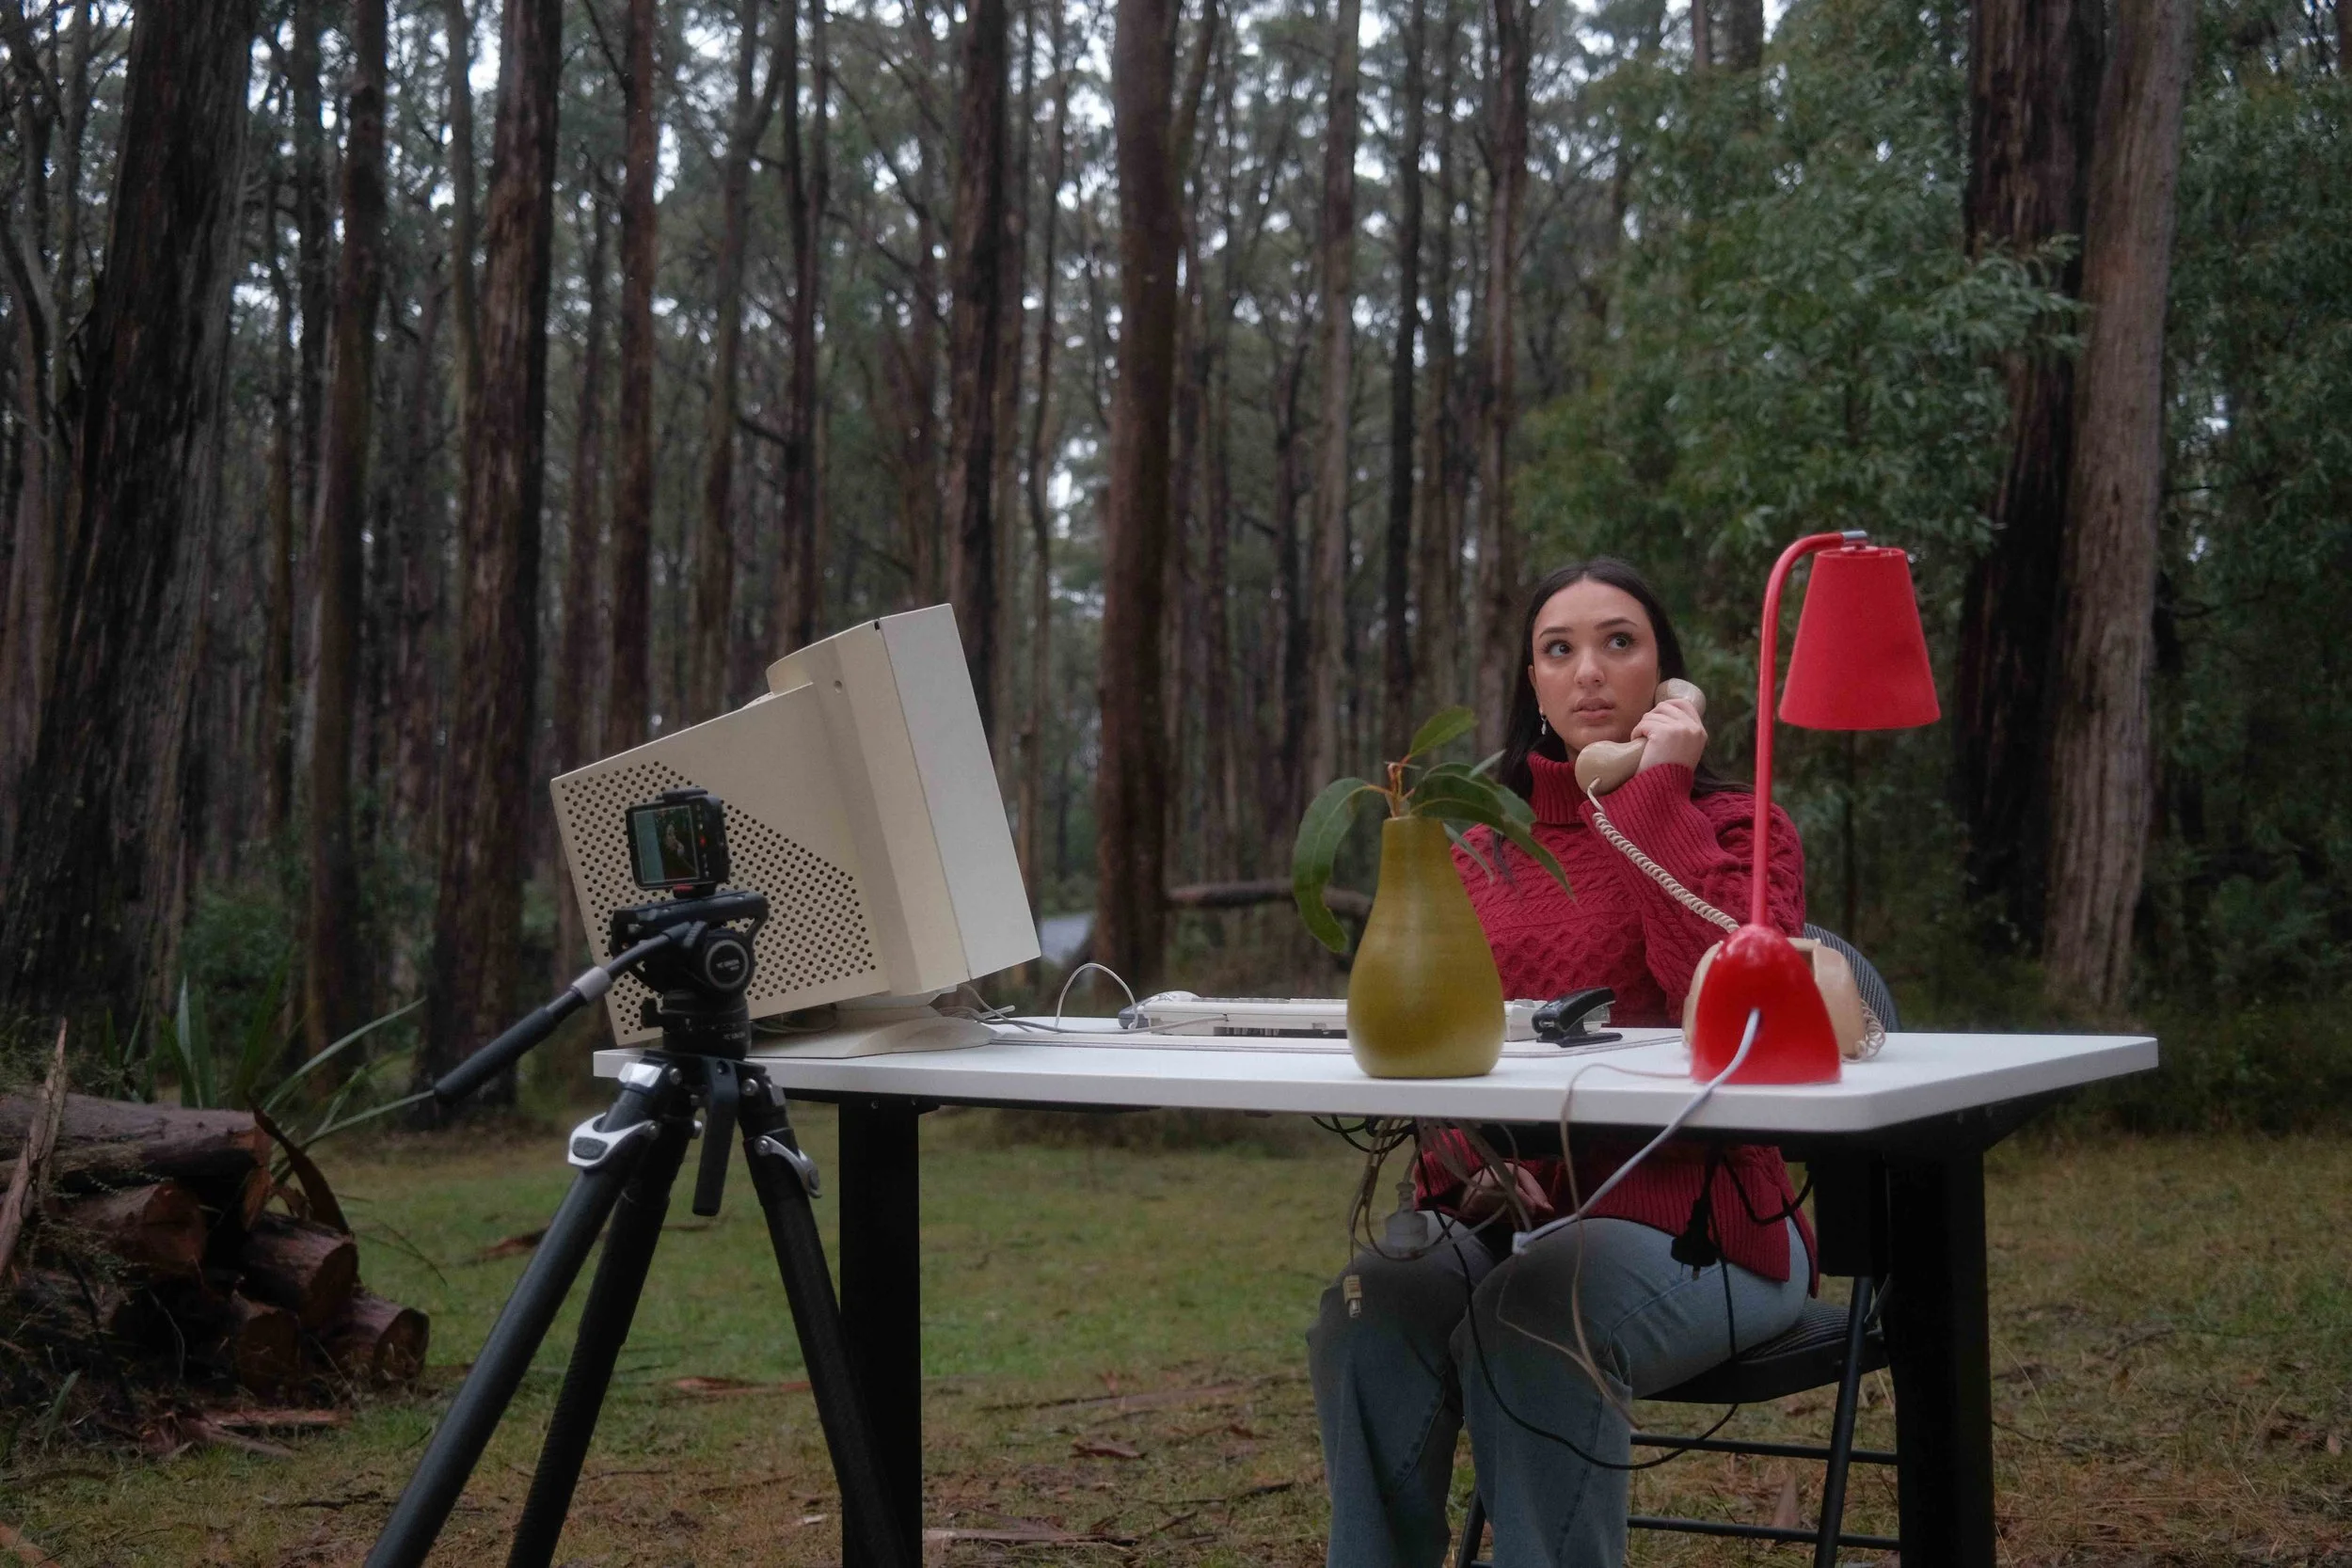
Our favourite location and production-design process was undoubtedly the bedroom sequence. Going shopping for an eclectic bunch of items to fill out the bedroom space was incredibly fun, whilst amassing a haul of personal items that were reminiscent of the 90s / early 2000s era turned a 70s AirBnB living room home into a warm where our computer-man operated the retro iMac. I thought it was novel and quite full circle that we were to include the original 1998 iMac G3 in this film, given we shot it on iPhone it felt fitting! Plus the Bondi Blue colour really stood out on the desk, and completed booted up and worked.
Behind the lens of the bedroom set, shot on my iPhone 16 Pro.
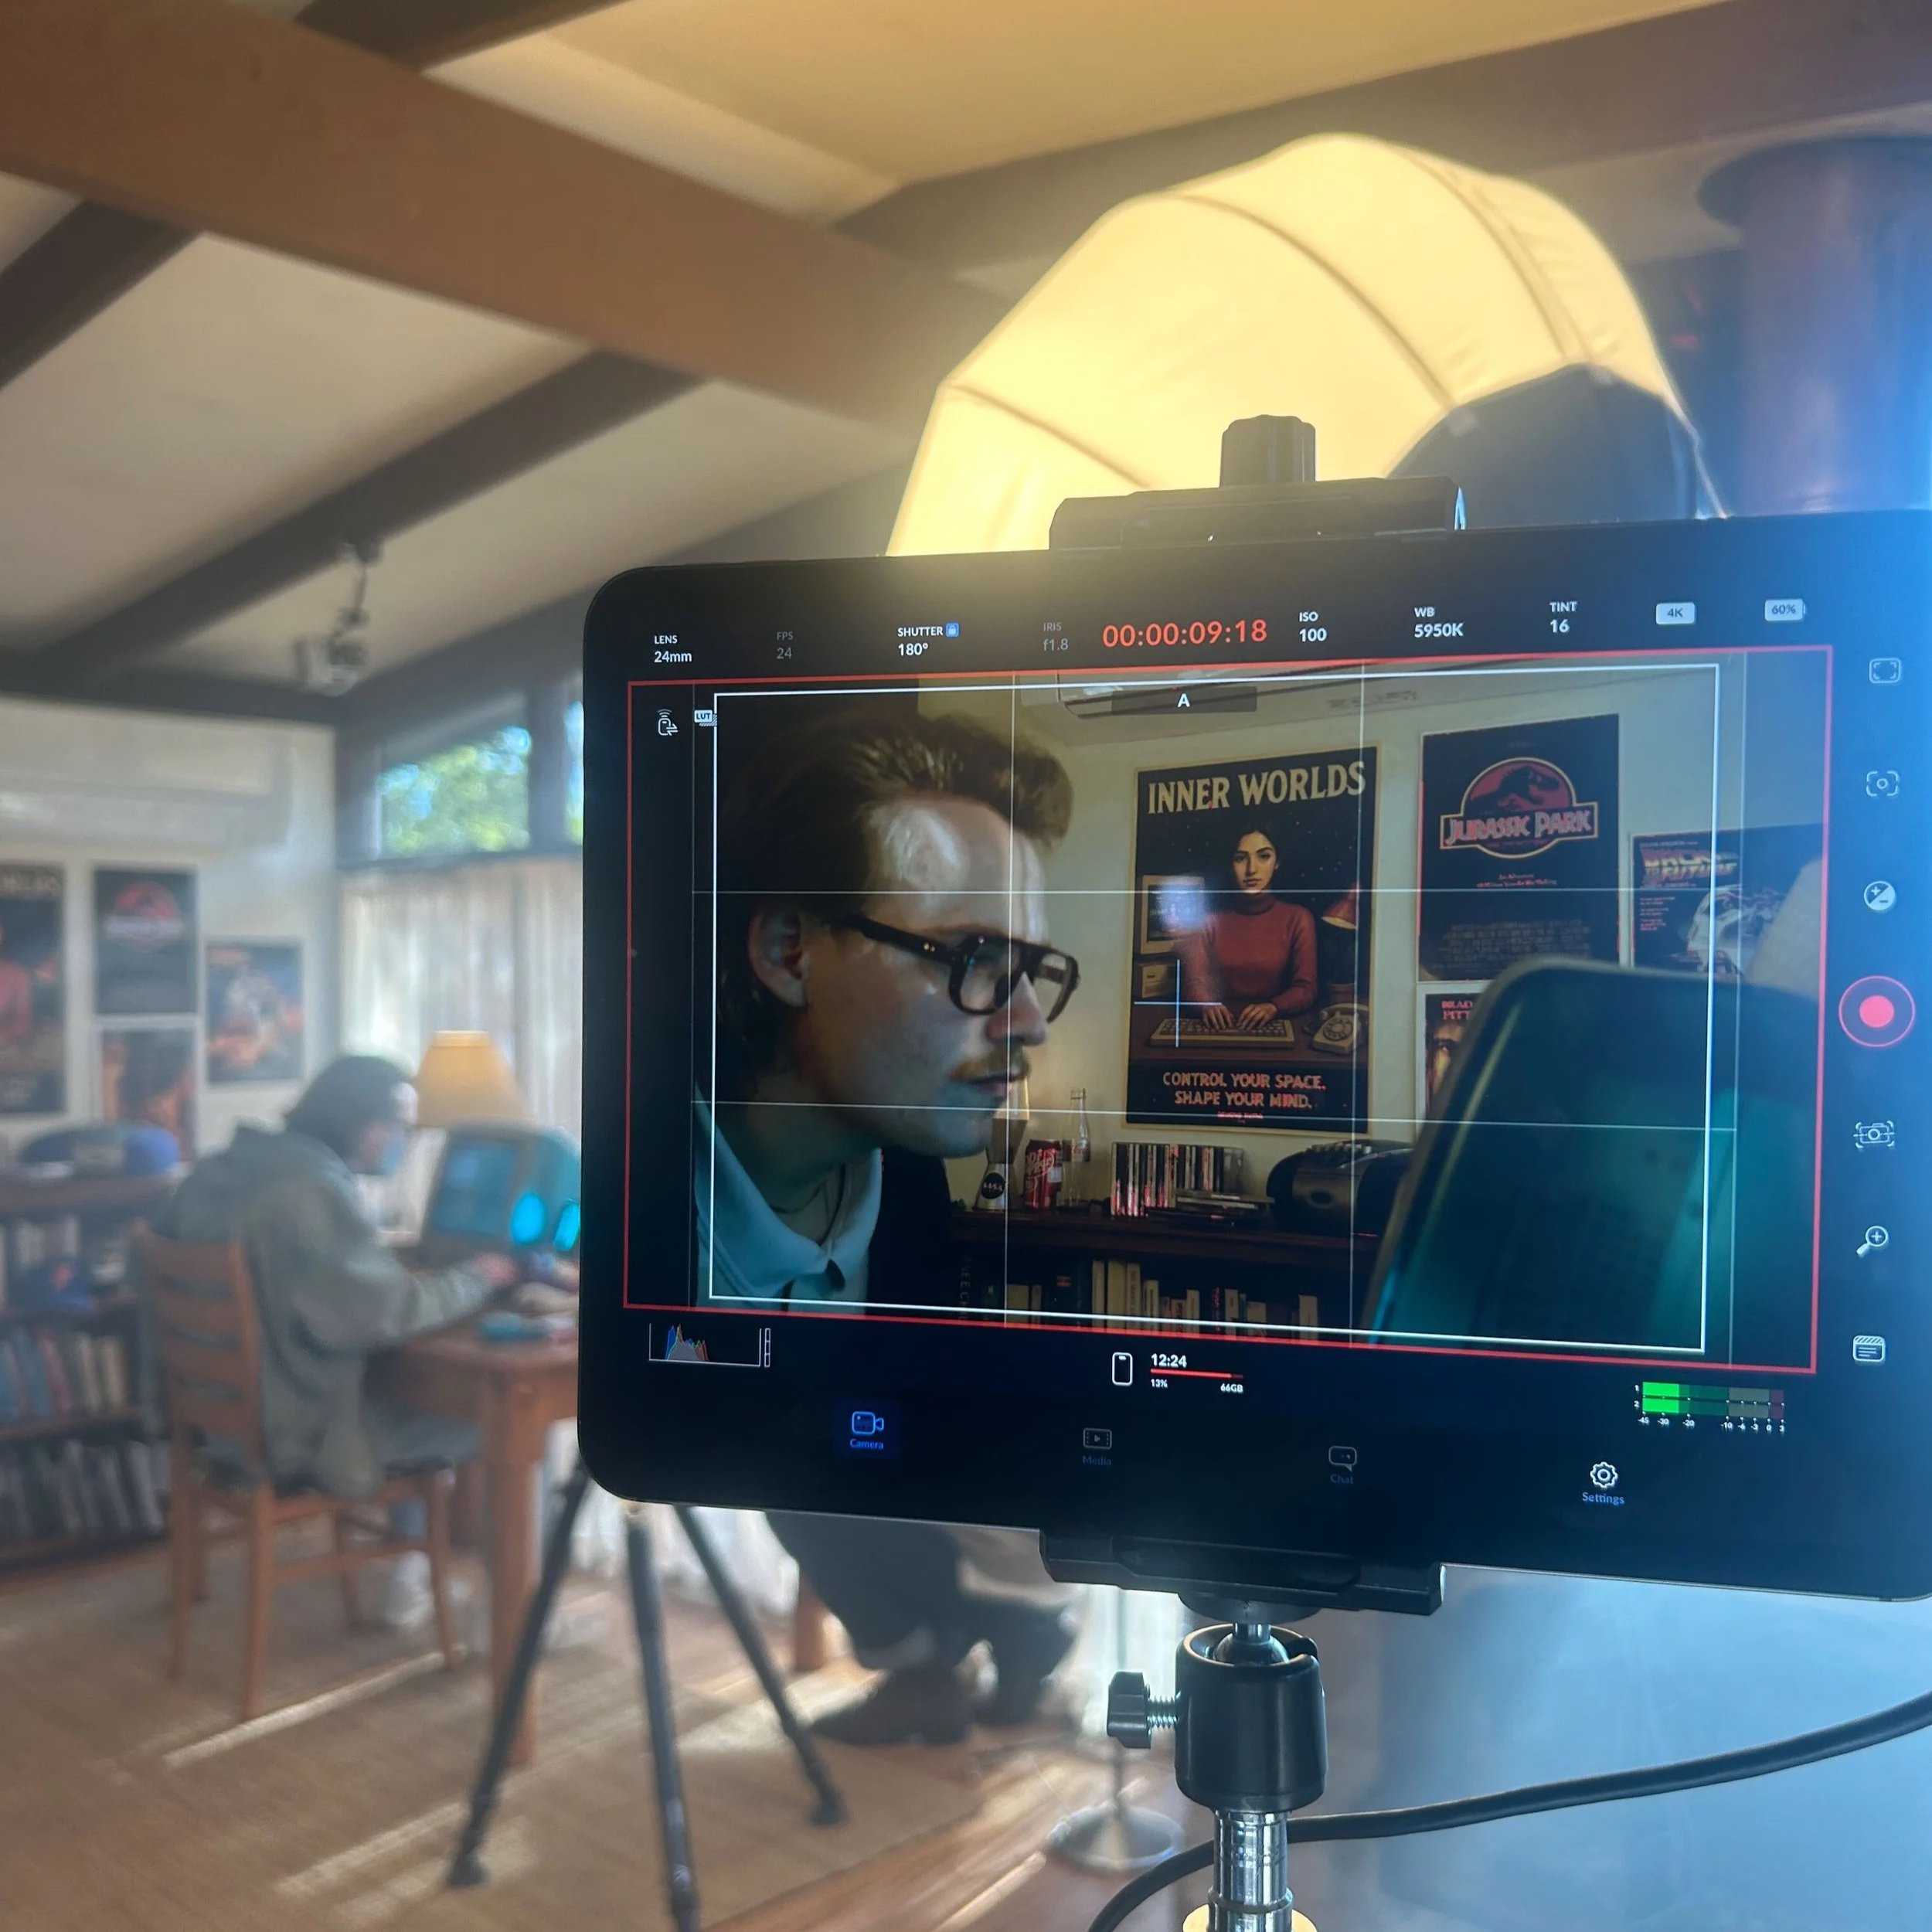
Lastly, an amusing anecdote. One day prior to shooting the bedroom sequence, we realised that it’d be interesting for our gamer to have the poster of the video-game he was playing on the wall, which would also feature a small easter egg, of the computer software project title, our protagonist was working on ‘Inner Worlds’. Making a piece like this from scratch was unfortunately unfeasible given the time-frame, so we turned to Sora to generate a base image, which I then brought into photoshop and spent a night tweaking. Some might be reluctant towards using tools like these, and I completely understand.
For the purpose of this short, our relatively small budget and the turnaround-time required, I’m glad we had something there. Thousands of human hours went into making this film, and I’m so grateful to everyone that helped out, and to the team at Little Print who were able to do a print overnight for us!
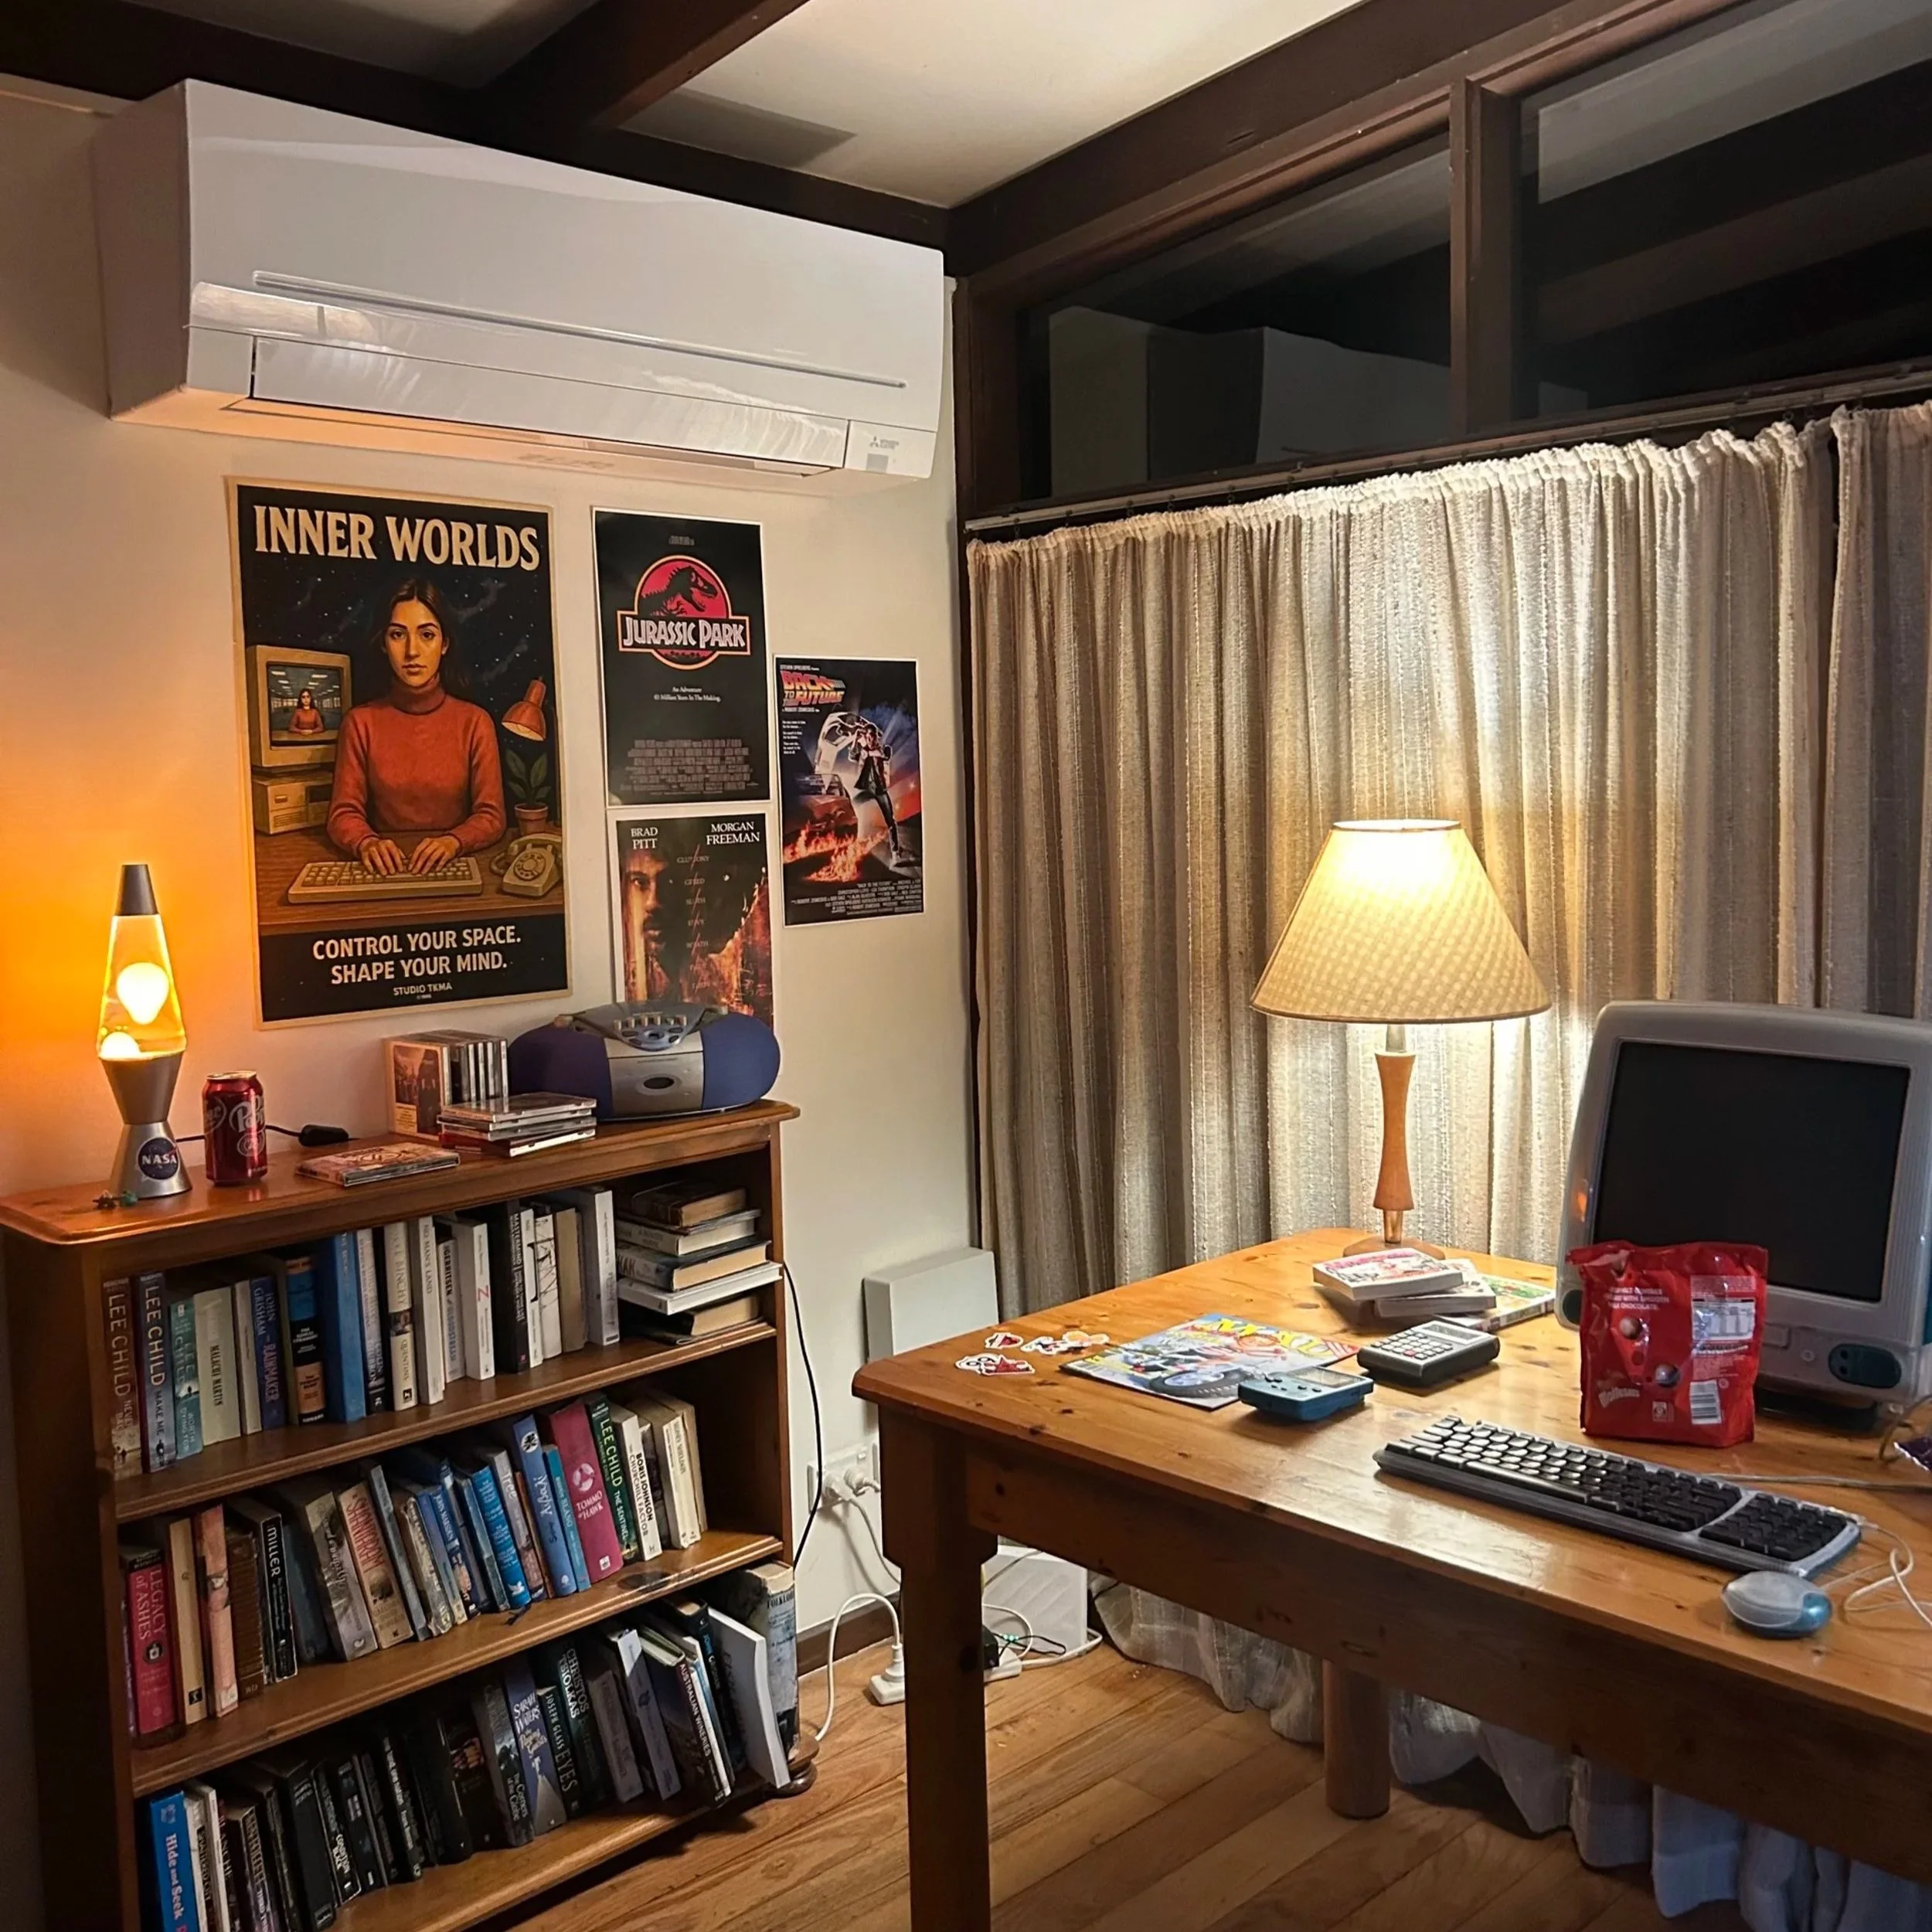
Designing the bedroom set was undoubtedly one of the most fun and rewarding on-set experiences we had in Unsaved.
Practical In-Camera Effects
Bringing a bit of practical camera trickery and magic was a huge goal for us in this short. We wanted to bring some visuals excitement and ‘action’ in our short that was mostly set in a still and sterile environment, via some effects done completely in camera. Notable inclusions are the simple, match-cuts of objects appearing in and out of frame, and using simple masks in Davinci Resolve to overlay shots when different objects appeared. Whilst more complicated shots included using fishing-wire to move the cup along the desk, a great tool that doesn’t require much, if any cleanup in post, given how thin and transparent the wire is.
One of the trickiest in-camera effects we achieved, was the disappearing mug effect. This take was completed over a dozen times, to provide the post-produciton editing process as many options as possible to achieve the match cut. A take was conducted where the mug was pulled at a short distance, our actress (Tia Jupi) would slam her hand on the cup, the cup was then manually removed, the hand lifted, and the motion continued. This whole sequence was just spliced together in post at the last possible frame.

Ali operating the fishing wire to achieve the self-moving mug effect in-camera.
Lighting & Cinematography
Most cinematography, ultimately doesn’t come down to the camera being used, but the lighting that was applied. Similar to our decision to use iPhone again for this short film, for it’s simplicity, I also took a very basic approach to lighting each scene in this short.
Two lights were used in the office. An Amaran 200x with a softbox pointed and shifted around our talent throughout the film, with a 100d pointed straight up into the ceiling to add a bit more fill to the space. Nothing crazy, we just maintained shooting position to be on the shadow-side for any closeups. Furthermore, the rest of the lighting in this sequence was done practically, with the fluorescent tubes in the ceiling of the office space.
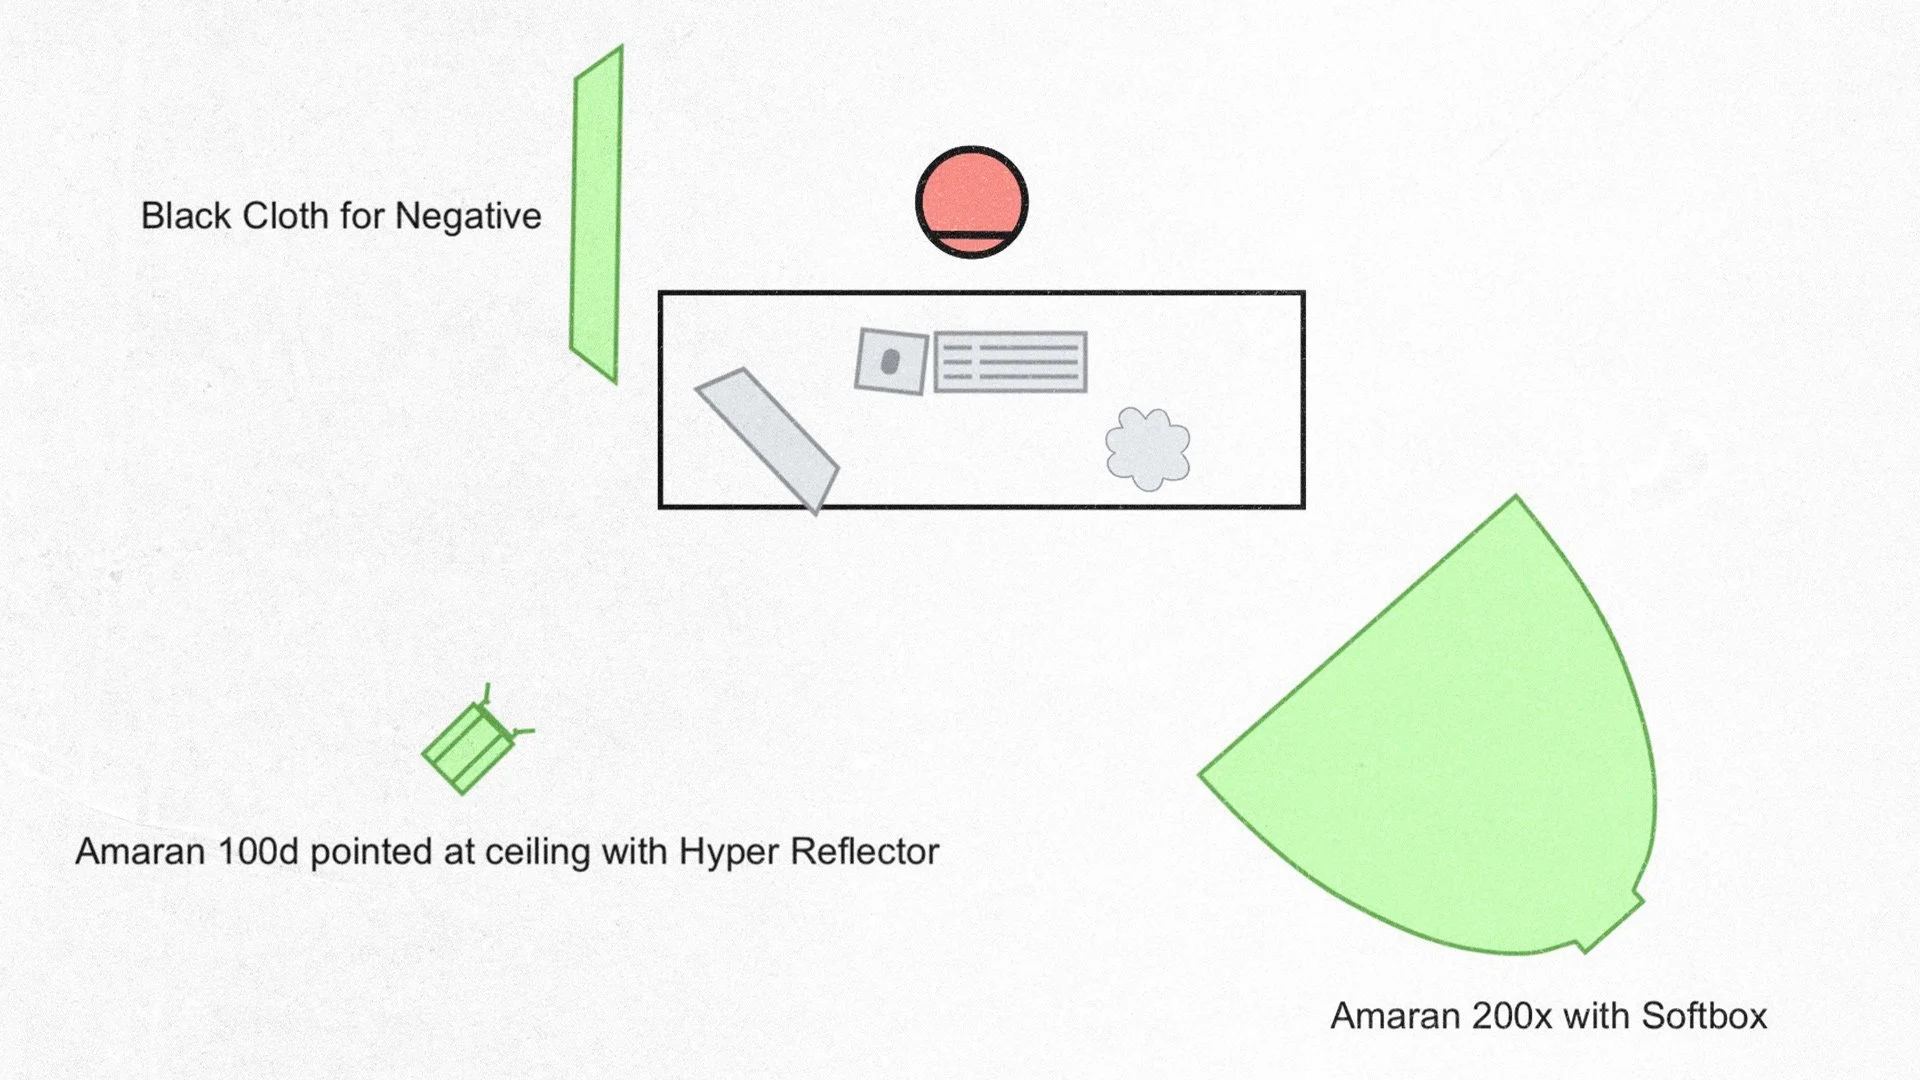
Unsaved. Office scene lighting diagram.
With the forest scenes completely natural light was used here, we shot this at about 4pm, so darkness was creeping in, but under a blanket of afternoon clouds and plenty of tree cover, the natural light offered plenty of diffusion on our subject. No additional lighting was required or modifiers.
The Forest set, no lighting required with the beautiful soft light coming from the overcast day.
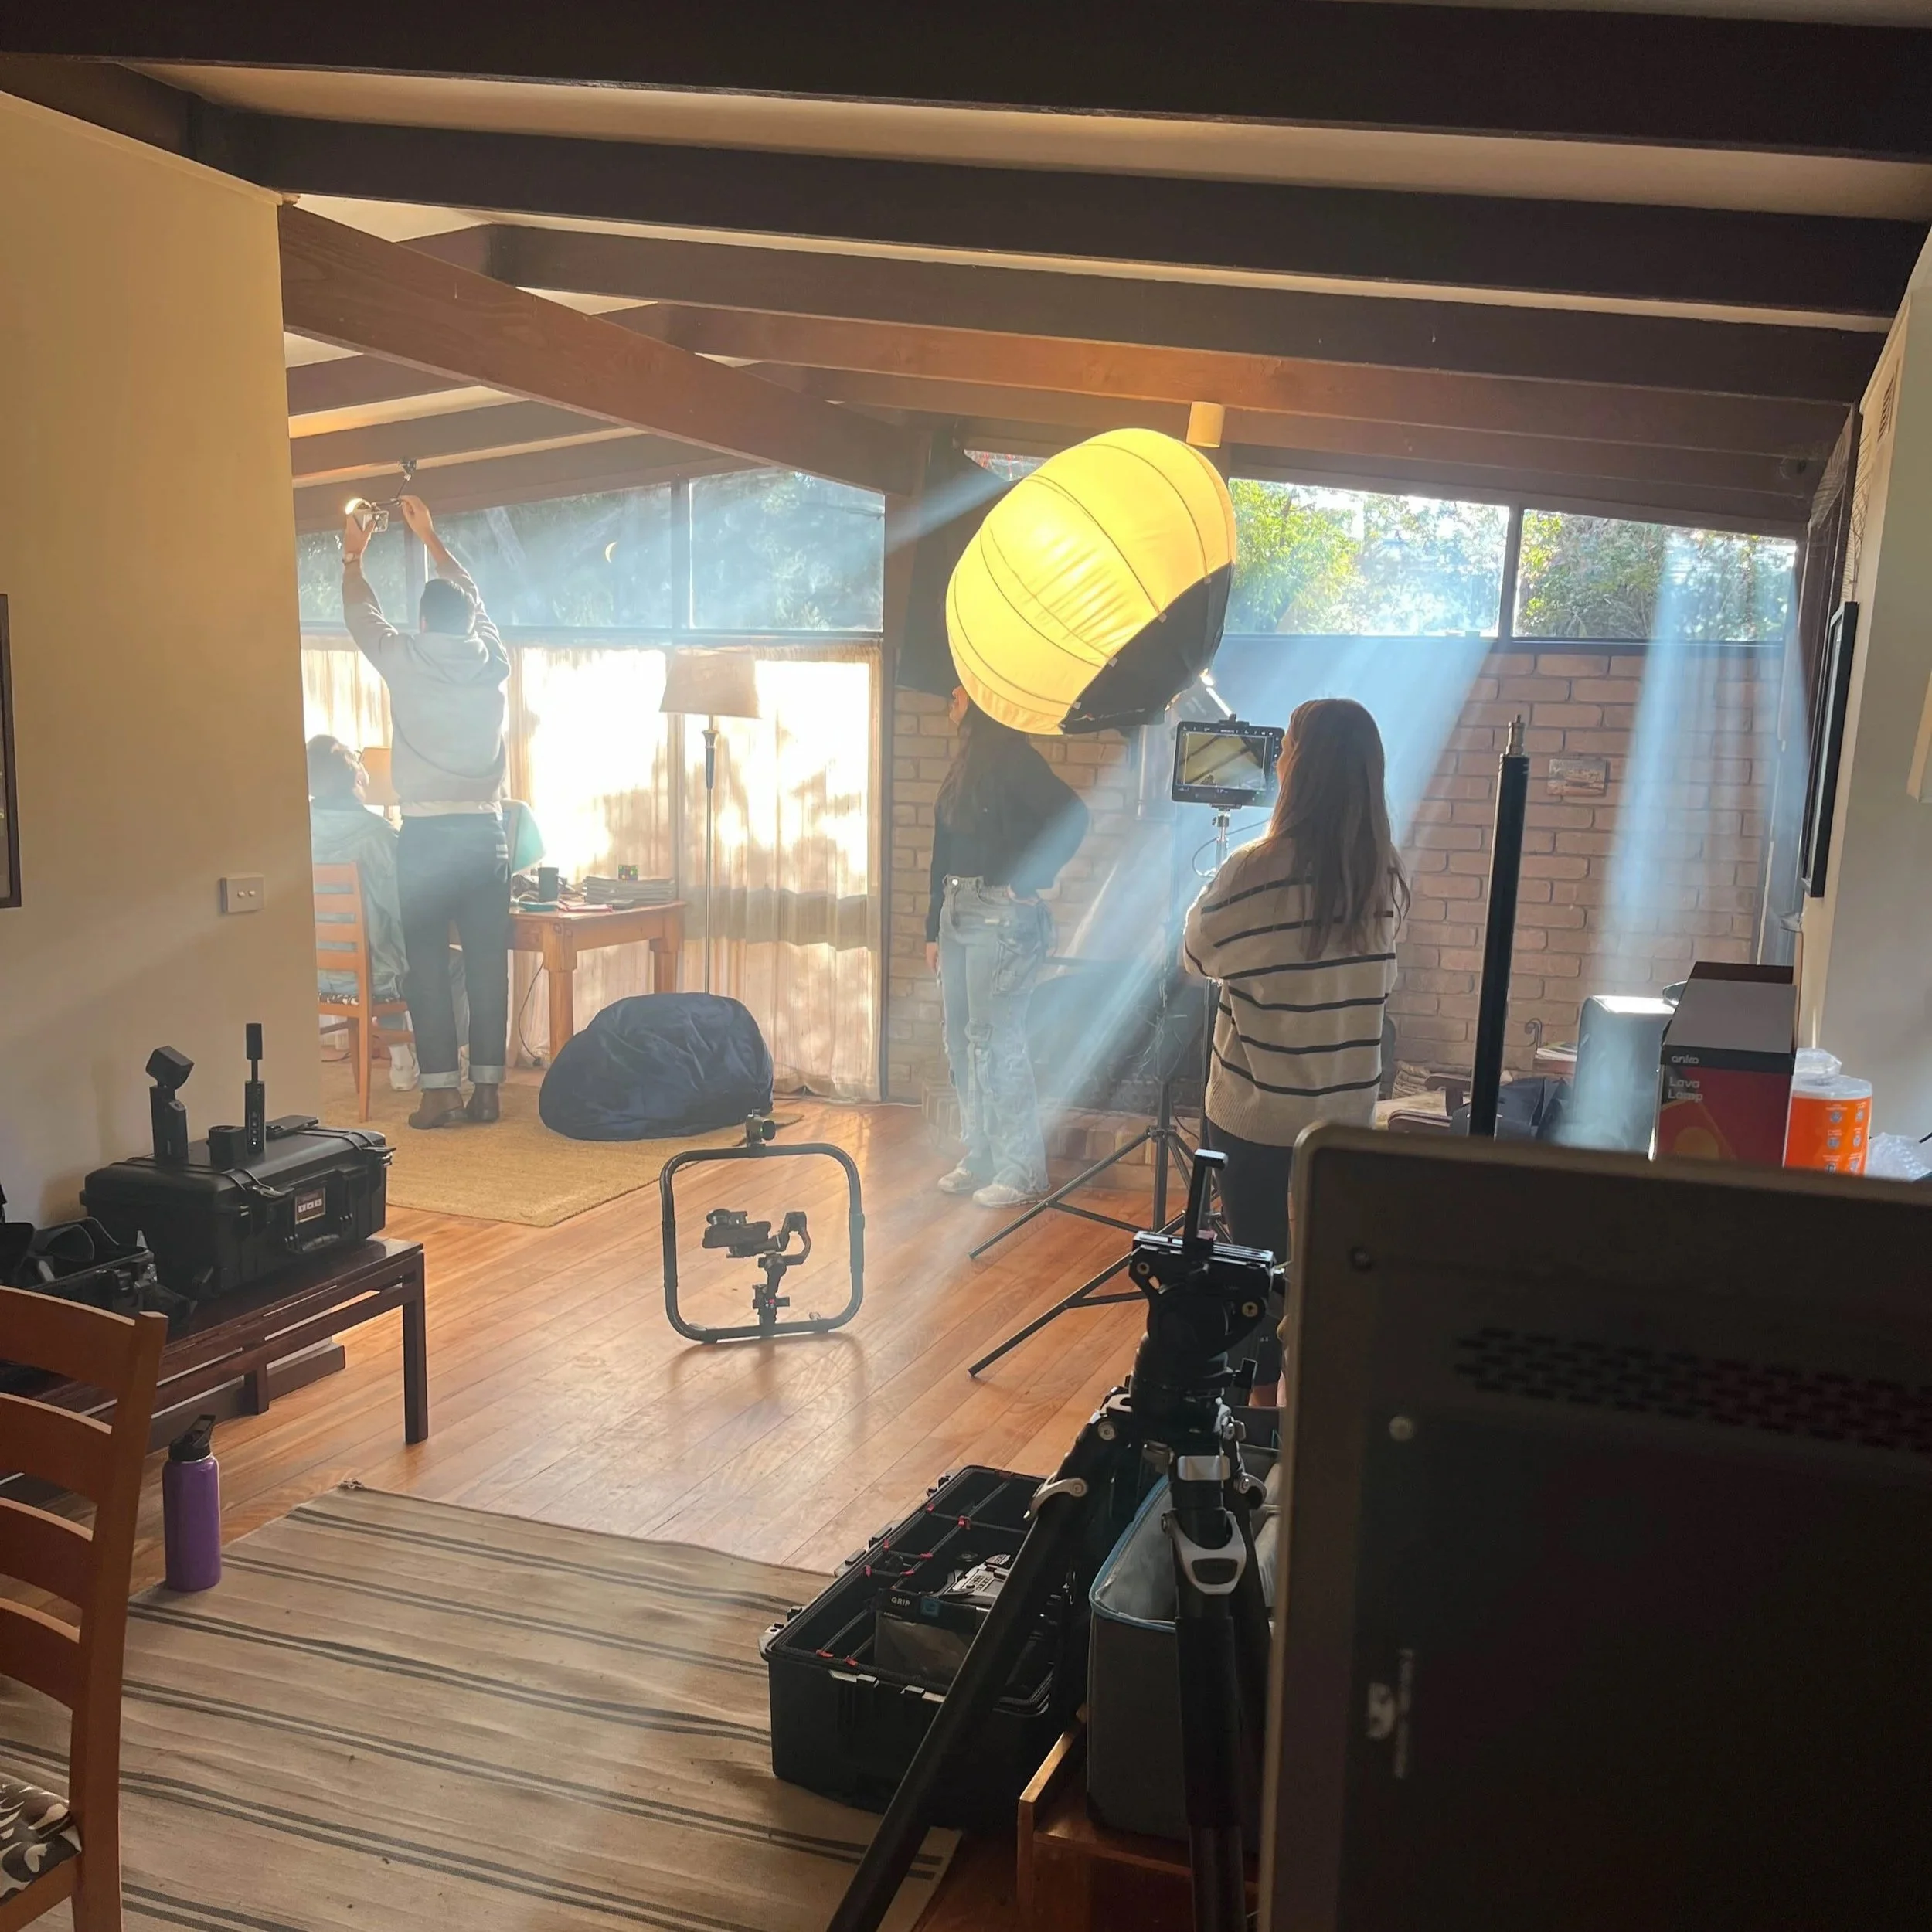
Having hired an AirBNB to shoot this sequence, and given the early shoot time for this shoot, it was clear that a simple, but bold, holistic lighting setup was used for these shots. I wanted to achieve a warm morning glow effect, synonymous with waking up in the early weekend morning feelings of the 1990s / early 2000s. As a result, I placed two Nanlite 720B’s outside the home and pointed them directly into the living room space. They were placed about 10 metres away from the windows.
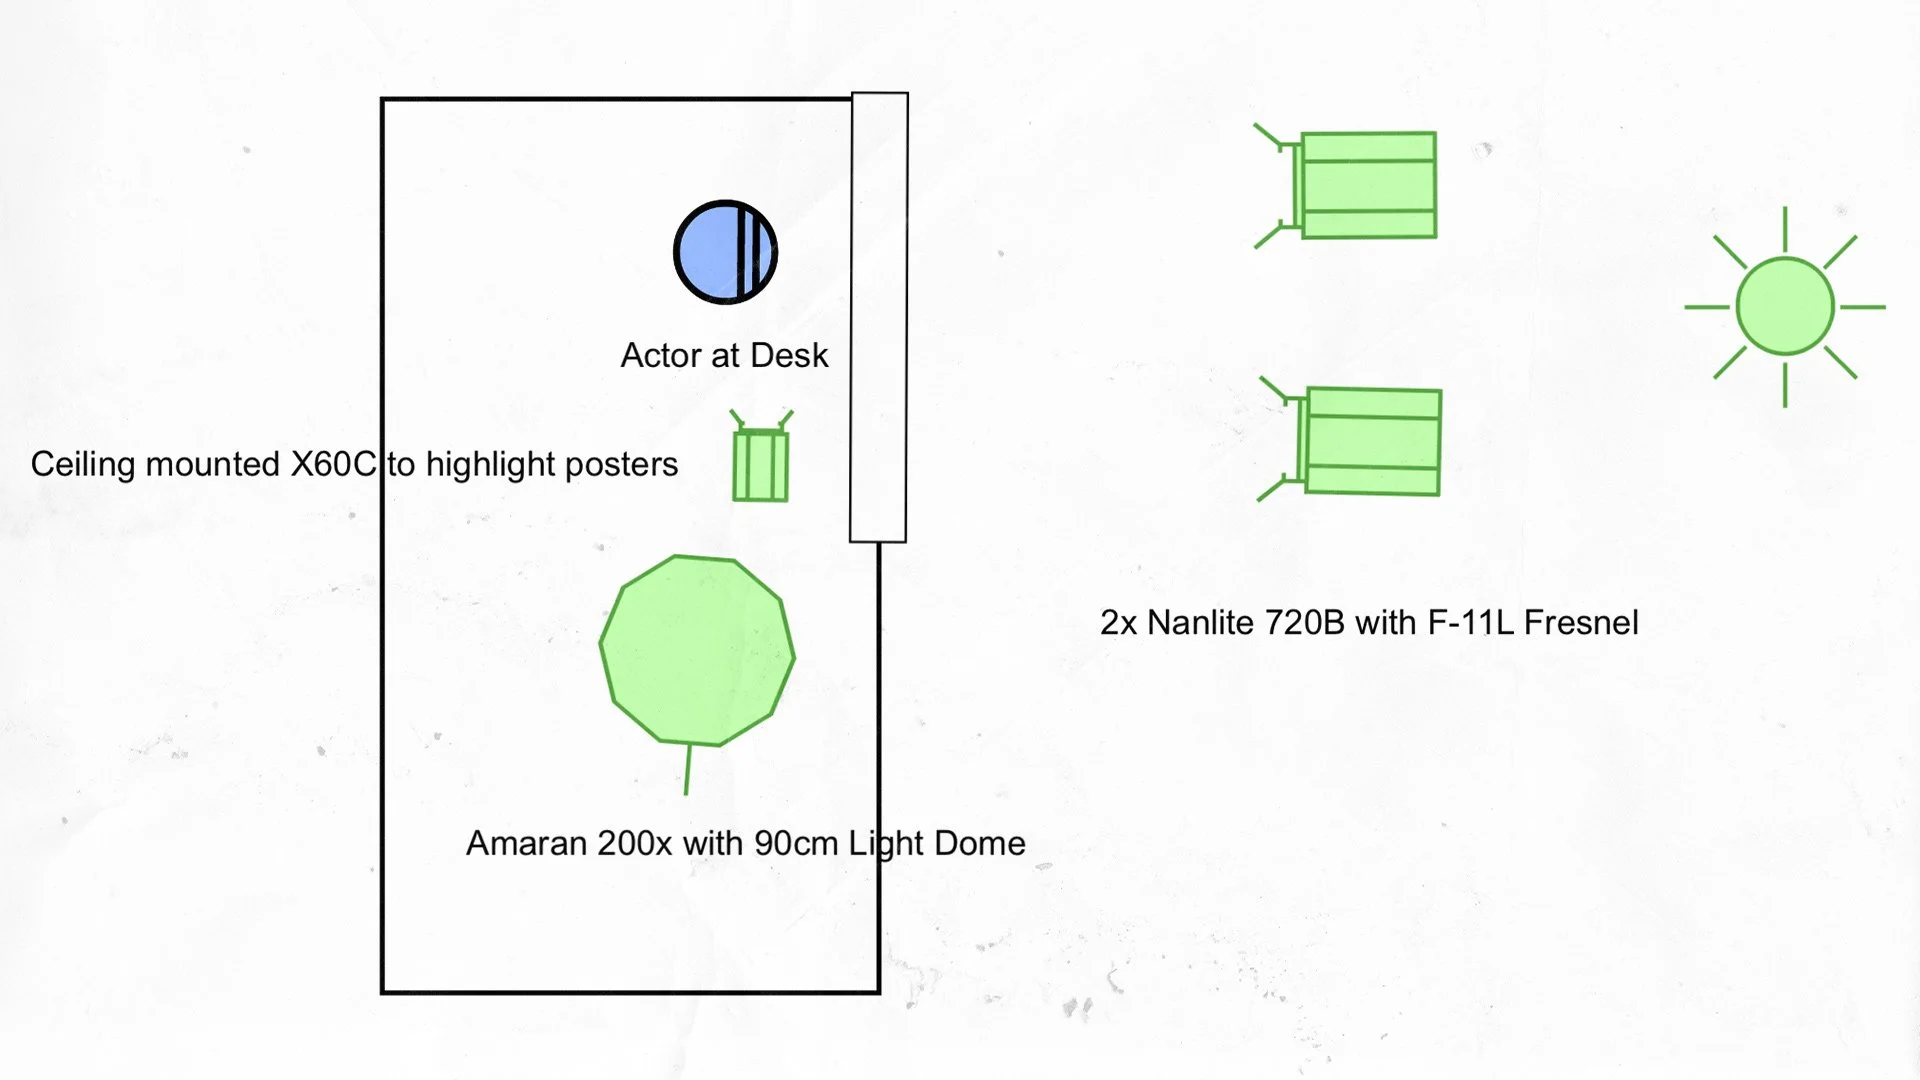
Unsaved. Bedroom Scene lighting diagram.
I utilised the curtains in the bedroom space, as a bit of natural diffusion too, as the hard light coming from the 720B’s were intensified by the Nanlite fresnels. Furthermore, it helped that the sun rose from relatively the same position as our windows in the morning, giving us an authentic look. I’ll definitely have to commend the Dynamic range capabilities of the iPhone 16 Pro here, with plenty of shadows being retained in the darker parts of the room, with please highlight rolloff and no clipping really occuring in the highlights on the curtains. A pleasure to grade as a result too!


Lastly, a couple of supplementary lights were also used for some of the closeups, a Ziyhun X60C light was mounted on the roof beams pointed towards the poster just to give it a little highlight (although the battery on that ran out an hour into the shoot so who knows if it made the final shot). And a small square light was used for the PC closeup on the operators face to imitate a bit of blue light coming from the display.
The whole bedroom sequence was shot in less than 3 hours, hence why the wholistic, and simple lighting setup was necessary for quick setup and pack-down. A bit of interior fill was also used by my 200x behind the subject.
The bedroom sequence (really was a converted lounge-room in an AirBNB).
Utilising Haze
Unsaved was also the first opportunity I had to utilise two cinematography grade haze machines by PMI. Specifically they were the SmokeNINJA Pro - Hazer Kits, and despite how small the units were, they sure were mighty. Used exclusively in the bedroom scene, they were able to fill the whole room with dense, but subtle haze that added an incredible amount of nostalgic, beautiful light quality to the space. Especially loved seeing the light streaks accentuated from outside.

Portable Haze Machine from PMI worked wonders! So great to have more filmmaking gear like my iPhone that’s small and lightweight.
Post-Production: Color Grading
I’ll keep this short and sweet, however, the color grading process of this short was by no means quick and easy. Shooting in Apple Log & in ProRes allows an incredible amount of flexibility in the grade. Allowing me to push the look I wanted really easily. I start of with my Apple Log Conversion Power Grade and LUT which get’s be a lot of the way there for the look, but then following that, plenty of additional nodes are added that include Color density changes, exposure and the list goes on.
Notably, utilising AI Magic Mask 2 within Davinci Resolve 20 was incredibly fast and usefull, that allowed for quick background separation and depth effect. If you’d like to learn more about how I colour grade, my Power Grade does come with a 40-minute extensive tutorial. But there’s also a few free videos on my YouTube channel that also showcase my processes.
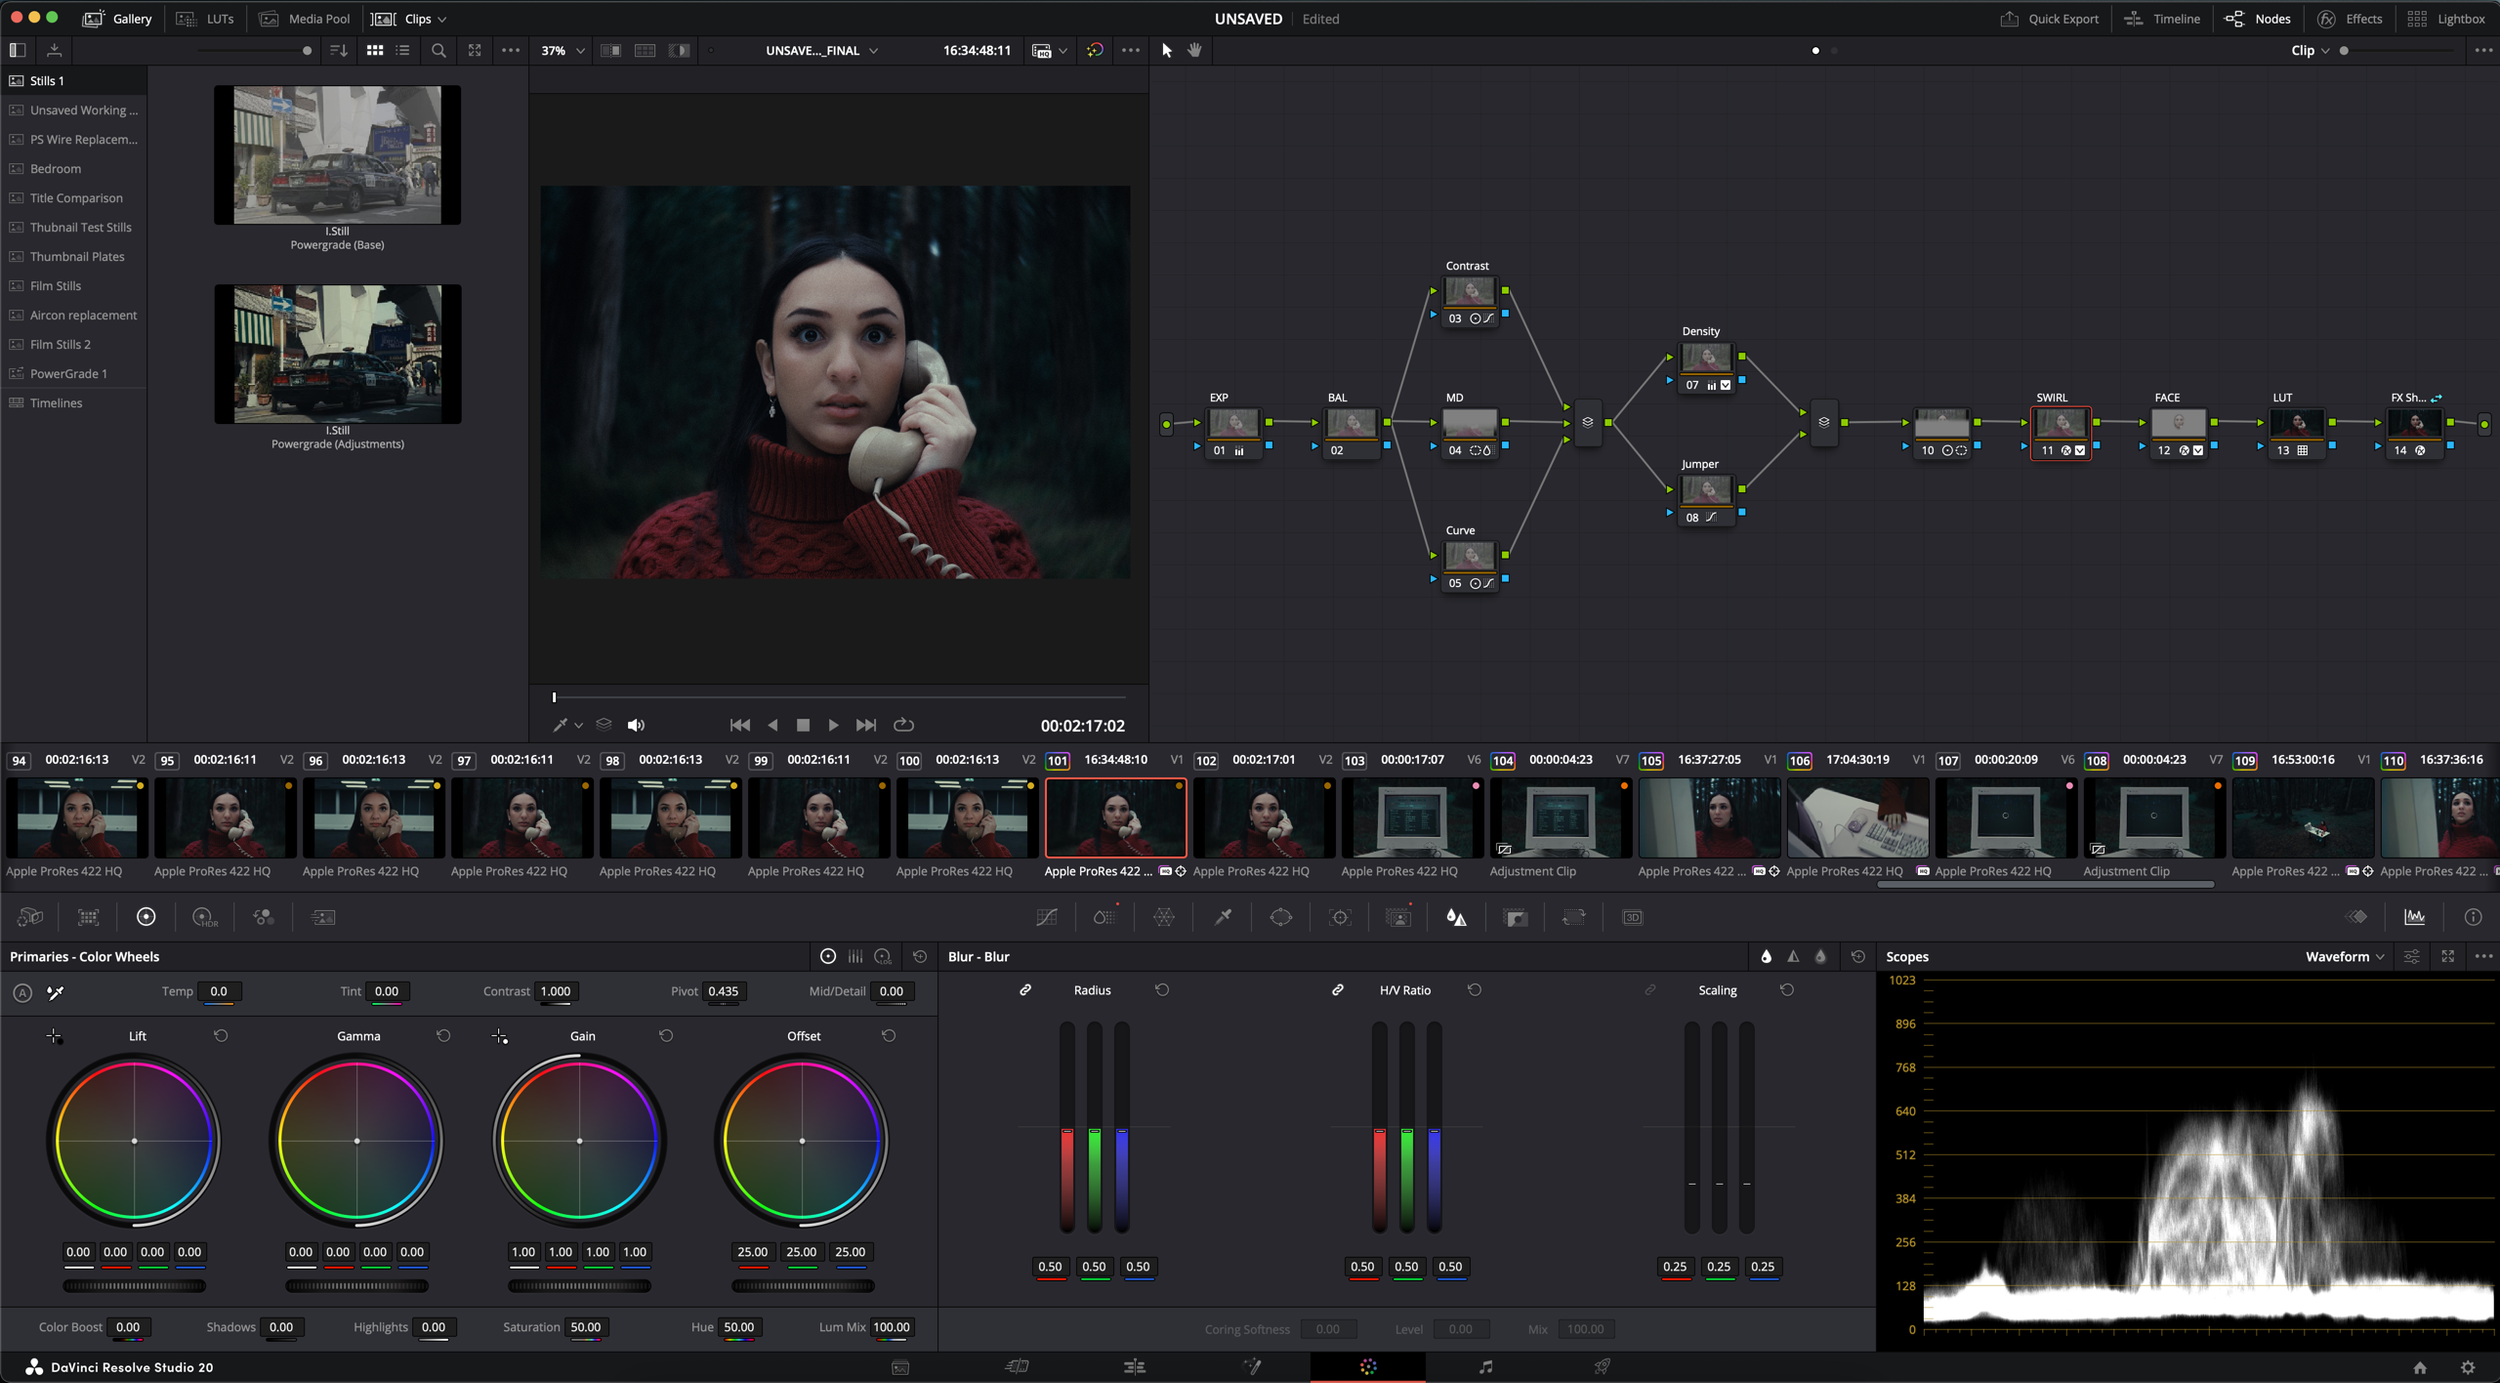
Unsaved was graded in Davinci Resolve 20. I follow my standard power-grade setup, alongside adding few additional custom nodes for this project.
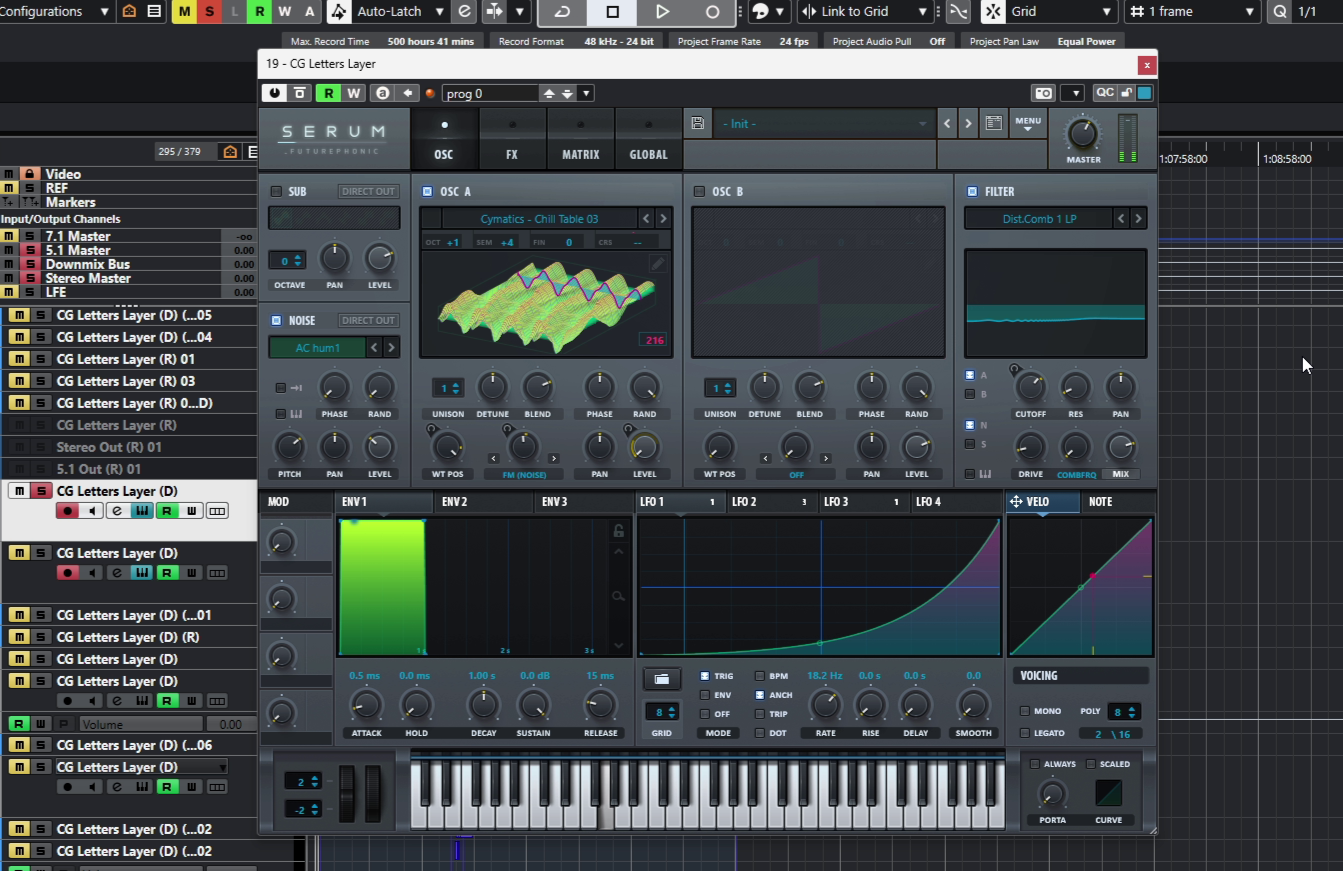
Post-Production: Sound Design and Music
Every sound you hear in Unsaved was completely created from our very talented sound design and music artist Paul Van Nimwegen. From small details of mug handling, to the analog whirring of the computer system, nothing was recorded on set and was all done in post. I’ve worked with Paul many times before on previous short films, but with this one in particular, he truly added a tremendous amount of depth to the world, making the story shine even without any dialogue.
“A short film like this is such a thrill to work on. Kirk and his team created something truly unique, while also embracing its inspiration. ”


Paul: We ended up not using any on-set recordings, so absolutely everything was recorded and designed from scratch. As the film utilises retro-style tech, I wanted all of the UI SFX to feel vintage and worn, finding a balance between what an audience would expect to hear and something that still feels unique.
I designed a catalogue of beeps, glitches, scans, errors, etc., in Serum and processed them with a chain of Goodhertz plug-ins and UAD tape emulators. Those sounds were then resampled and processed again. Kirk went through the catalogue and confirmed which sounds he felt would suit the film. From there, it was just a fun process of bringing the computer to life with its own language.

Nuendo was utilised for the Sound Design and Cubase for the Score.
Paul: Even the room tone used throughout the film was synthesised from scratch in Serum. The environment is simulated, so hopefully on some level the audience senses that subconsciously, as the room tone is built from synthesised noise. I added harmonic saturation and convolution reverb, and modulated the resulting tones slightly to add subtle movement.
I found a wretched, old, cheap keyboard that had the perfect sound for an older, heavier keyboard used in the film. The keyboard is a character of its own. Close shots of it had heavy processing with multiband compression, saturation, and even Waves LoAir or Boom’s Enrage to generate sub-frequencies on heavy, close keystrokes. One of the most fun parts was designing risers and sub-impacts from keyboard hits.
The final mix was delivered in stereo for web upload from Paul, alongside a 5.1 mix for theatrical screenings in the future.
Paul: The coffee mug sliding along the desk is actually a variety of mugs and glasses, some with objects inside to add more density and texture to the movement. I found this really increased the weight and tactile feel of the mug. Just a small detail, but hopefully one that adds something memorable to the viewer’s experience.
My favourite aspect of the score is the final cue, which is a hybrid combination of “real” instruments such as strings, ebowed guitar, alongside synths. This hybrid combination explores the core of the story, in terms of what is real, what is simulated, and whether those distinctions truly matter.
Post Production: VFX
A huge yet understated portion of Unsaved was the VFX component. It may not seem like it on the surface, but a lot of work went into creating the simulated world of Unsaved, and much of that can be attributed to our VFX artist Van Tran. Screen replacement was the major part of the project, with Van completely creating the OS and UI from scratch. A blank screen was filmed as a plate, both in the office and the forest environments, with the screen replaced composited in.
Screen Simulation: Custom UI, Animations and Screen Replacement.
A similar approach was also conducted in the ‘one-shot’ transition that occurred from the forest to the bedroom. That sequence was captured in two seperate shots, with the second being a slow, gimbal operated dolly pull, about 20 centimetres from the iMac screen, outwards, into the wider POV shot of the computer operator. Originally, my intention was to do these in seperate simple cut shots, however, Van pitched the idea of shooting this sequence in one, adding to immersion that our female lead (Tia Jupi) was truly in a simulated environment, being controlled by her video game enthusiast overlord.
Lastly, some additional cleanup was conducted, mostly in the bedroom sequence, with an air-conditioner unit being removed on the wall, to match the time the film was shot in, alongside some basic wire removal too (from the cup pulling sequences mentioned earlier).
The Bedroom - Screen Replacement and Scene Object Cleanup.
And, one more thing.
Forgetting everything I’ve written above, there’s something more important than all the technical elements and creative design that bring short films like these to life, and that’s the people you make them with. The ones who give up their time to come out and contribute to making movies.
I’d especially like to thank Tia and Matt for their support on set and behind the scenes. And of course, Ali Wells, whose unwavering enthusiasm, dedication, and commitment to making short films with me and the team have been invaluable. Without her, these films wouldn’t have been possible.
That said, pick up your iPhone, grab some incredible friends, and just get out there and make movies!
Furthermore, here is a gear list with links to purchase if you’d like to try out any of the gear yourself.
iPhone Filmmaking Gear List (with Links)
iPhone 16 Pro 512GB
Sandmarc iPhone Case (Included when a Lens is Purchased)
Hopefully you enjoyed this breakdown. If you have any questions feel free to contact me using the links in the header or footer, or message me anywhere on socials (@KirkMihelakos).
Cheers!
— Kirk
Frequently Asked Questions (FAQ)
-
iPhone 16 Pro (512GB) Model. Utilsiing the Blackmagic camera app. Shot in Apple Log using ProRes for the codec.
-
Davinci Resolve 20
-
I applied a Magic Mask and power window (depending on the shot) to the foreground subject, to mask it OUT, of a radial blur effect applied. A free, included effect available inside of Davinci Resolve 20.
-
I follow a pretty standard process for all of my iPhone footage grades. Shoot in Apple Log in ProRes for maximum color fidelity, and dynamic range + Bit-depth. Bring it into resolve, apply my Apple Log conversion LUT first, and work from there. I have a Powergrade template that I use in resolve to speed up the workflow too, which includes Davinci Resolves Film Look Creator.
-
It’s such a small versatile camera, that requires minimal crew and setup time. Allowing us to focus on what matters, filmmaking, storytelling, and just having fun doing it all.
-
Sandmarc Lenses (Wide and Telephoto), and an ND filter were the main accessories. The rest are detailed above in the gear section that was used on set.
-
A very simple lighting setup was utilised. Consisting of one key-light and a fill light in the office setup. Natural light in the forrest. And two key-lights outside the bedroom sequence.
-
100%. Yes.
Film Links
High Quality 4K ProRes Upload:
There’s a lot of work that goes into putting a short film together, and sometimes all of that work is compressed significantly on YouTube. So if you’d like to watch a high-quality uncompressed version of Unsaved, take a look at this link below.
Review Unsaved on Letterboxd
Review Unsaved on Letterboxd Here
YouTube Upload:
Support the channel and watch the film here! Be sure to come say hi and drop a comment too and all the other subscribey stuff YouTubers typically ask for.
Some links may be affiliate activated which help us shoot more short films!